Thursday, March 30, 2017

National Craft Month Celebration Blog Hop


Hi there, I'm excited to be joining Right At Home today for their National Craft Month Celebration Blog Hop. I can't think of a better reason to hop than celebrating the crafting hobby and community we all love so much!

You should have arrived here from crafting rockstar Laurie Willison. If not, you can find the beginning of the hop HERE with Nicole from Right At Home

Check out this absolutely darling stamp set, Make Something Beautiful, that Right At Home is releasing for this occasion! Hop with us and comment along the way for a chance to win this set.


Right At Home | Make Something Beautiful

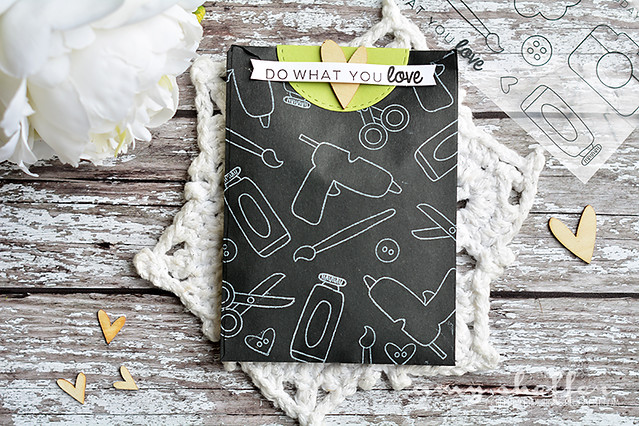
Make Something Beautiful is perfect for all kinds of crafter-to-crafter cards and gifts! I decided to put together some quick and simple gift bags for some of my crafty friends. 

Right At Home | Make Something Beautiful

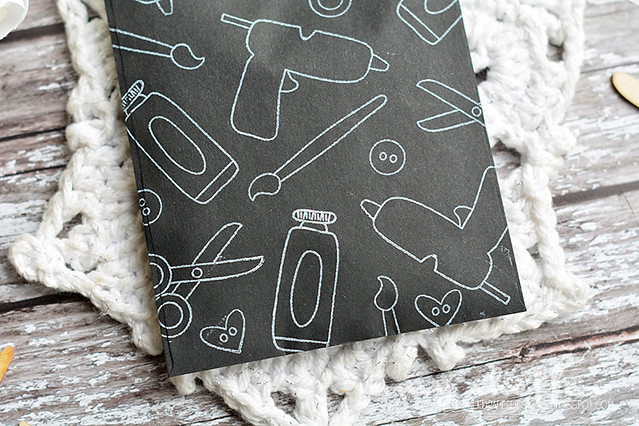
I started with some chalk paper bags from Jillibean Soup, then stamped some of the images randomly in white ink for that chalkboard look. 

Right At Home | Make Something Beautiful

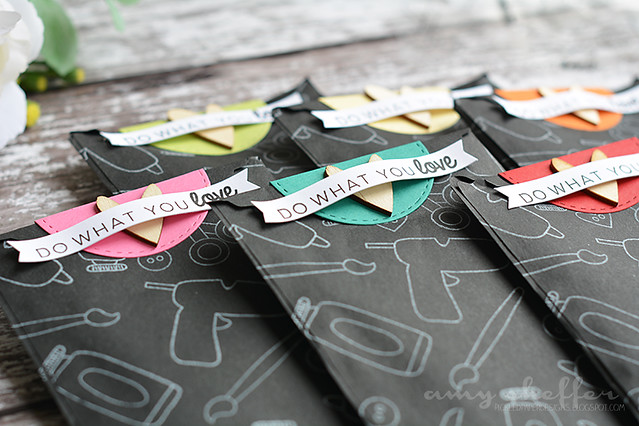
After filling each one with crafty goodies, I folded a circle die-cut over the top, then added a wood veneer heart and the "do what you love" sentiment. 


Right At Home | Make Something Beautiful

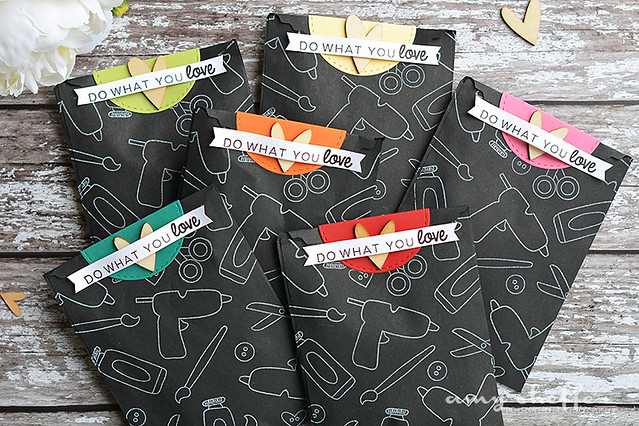
These came together in minutes and look fantastic thanks to the adorable images. I can't wait to share these at my next crafty outing!

I am the last stop on today's hop. Thanks so much for joining us today!


Sunday, March 26, 2017

Thanks So Very Much - March SFYTT

Thanks So Very Much

Reverse Confetti's March Sketch For You To Try is winding down. If you haven't yet played along, why not whip up something fun with this month's sketch? The winner receives a $20 Reverse Confetti gift certificate! Deadline to enter is noon CST Wednesday, March 29.

Here's the March sketch:


And here's my take, rotated 180 degrees:

Thanks So Very Much

The pencil image is from Worm Wishes. I used the Office Edges Confetti Cuts to add the notebook border along the left of the white panel. The sentiment, from Posted Note Sentiments, is embossed onto a stitched border circle that I die-cut with the Pop Up Circle Confetti Cuts die set.


Friday, March 24, 2017

More Queen & Company Foam Front Shaker Cards

Happy Friday! I'm over on the Queen & Co. blog today with lots of card ideas. Hope you'll visit me over there! In the meantime, here are a few peeks:

It's Your Big Day

I have a pair of Disney-inspired shaker cards, this first one being in more traditional red, yellow, and black. 

Don't you just love that yummy mix of Toppings in the shaker? I combined a few different products in there: Sequin SprinklesDonutsPosies, and Pops. Up top, along with some star garland die-cuts are some Rivets (I love the Rivets -- think enamel dots with a matte finish) and some Lollies, those lollipop (or bull's eye) embellishments. 

The Magic Foam Front Shaker Kit comes with the foam card front, card base, acetate, and white card stock top layer. I used the Magic Foam Front Die  (sold separately) to make a black top layer instead.


Make A Wish

I also did a pink and very girlie version, again filling the shaker with a mixture of Toppings: Sequin SprinklesPosies  Candy Sprinkles, and Bitty Beads. I've always loved Queen & Company's washi tape! Here I layered three different ones for the border on the left and used another one to make a bow for my mouse ears.


Hello | Foam Front Chevron Shaker Kit

My favorite of today's cards features the Chevron Foam Front Shaker Kit and a mixture of blue, green, and yellow Donuts.


Thanks So Much

And last is an off-beat take on the Bubbles Foam Front Shaker KitThose flowers are hand-doodled around the "bubbles" and then loosely watercolored for an artsy look. The shakers are filled with Pastel Diamonds.

I've shared all of my steps and lots more pictures on the Queen & Co. blog!

Thanks for visiting! Have a great weekend!


Thursday, March 23, 2017

Be Wild & Free

Be Wild & Free

I'm really loving Reverse Confetti's Boho Vibes set. Today, I've watercolored with Distress Inks over clear heat embossed images.


Be Wild & Free

I've used (and really liked) these blue, yellow, and gray colors before: Weathered Wood, Stormy Sky, Scattered Straw, Pumice Stone and I think some Wild Honey for the more saturated gold areas. 


Be Wild & Free

I added some tiny silver stars, ink and water splattering, and some jute twine and beads for simple accents. The watercolor panel is mounted to Reverse Confetti's new Sand card stock.


Stamps: Boho Vibes
Ink: Versamark; Weathered Wood, Stormy Sky, Pumice Stone, Scattered Straw, Wild Honey Distress Inks
Paper: watercolor paper; Reverse Confetti Sand card stock
Other: clear embossing powder, heat tool, jute twine, silver beads, silver sequins


Thanks for stopping by!


Wednesday, March 15, 2017

Wednesday in the Works: Nail Polish Marbling Video


Hey there, I'm over on the Reverse Confetti blog today with a Wednesday in the Works tutorial on Nail Polish Marbling. I had a lot of questions on this technique last month when I used it on the card I made for Jen's #beastmode Blog Hop, so I put together a short video to show you how easy (albeit messy) it is! 

Hope you'll visit me on the Reverse Confetti blog and check out the video HERE on Reverse Confetti's new YouTube channel.


Monday, March 13, 2017

Queen & Co Shaker Cards

Be Happy - Butterfly Shaker

Hey there, I'm on the Queen & Company blog today with a look at some of their ingenious shaker products. If you love shaker cards, but find them difficult to make, you'll want to check these out! Four easy steps: Peel and stick, fill with any of the amazing Queen & Company Toppings, cover, and decorate. These kits make creating shakers a breeze! 

I'm sharing two different cards I made with the Solo Butterfly Card Kit, beautiful Toppings, patterned paper, and various embellishments. The Solo Butterfly Card Kit includes two card bases, two pieces of foam with removable butterfly die-cuts, acetate, and a white pre-die-cut top layer ready for decorating. Head on over to the Queen & Company blog for more info on any of these cards.

Get Well - Butterfly Shaker


I'm also sharing two cards I made with the Birthday Shaker Kit. These are smaller shaker elements rather than full card fronts, perfect for cards, tags, and scrapbooks. Again, lots more information and more photos on the Queen & Co blog.

The birthday kit comes with six shaker shapes: three party hats, three candles, and three slices of cake. Here's a look at the party hat:

Celebrate - Party Hat Shaker


And here's a look at the candle:

Make A Wish - Birthday Candle Shaker

I had so much fun making these cards!


Thanks for stopping by!


Wednesday, March 8, 2017

Reverse Confetti March Release Hop

Easter Blessings Trio

Reverse Confetti's March release is now available, and the Confetti Crew is celebrating with a new release blog hop. So glad you're here!


Alleluia

I have a trio of cards today. Each features a sentiment from Easter Blessings and one of the new cover panels. Easter Blessings is the newest offering in Reverse Confetti's faith-based line. 

On this first card, I started with three Drop Cover Panel Confetti Cuts die-cuts, stacked them together, and backed them with a peach patterned paper panel. 

Alleluia

Next I added a strip of floral paper and some yellow seam binding tied off in a bow. 


Alleluia

The turquoise circle was done with a Lacy Scallop Circles Confetti Cuts die. The pink Cross Confetti Cuts die-cut is topped with a yellow flower (that die is also in the Cross Confetti Cuts set) and some bling.


Alleluia

My Easter Blessings sentiment is stamped in yellow ink onto a Cloud White Tall Tags Trio Confetti Cuts die-cut and lightly sponged with yellow ink. 


Alleluia


Stamps: Easter Blessings

Dies: Drop Cover Panel, Lacy Scallop Circles, Cross, Tall Tags Trio

Ink: Papertrey Harvest Gold

Paper: Reverse Confetti Cloud White card stock; Papertrey Harvest Gold card stock; 
Jillibean Soup Bowl of Dreams paper collection

Other: Queen & Co. yellow flower button, ink blending tool, foam adhesive, 
vellum, seam binding, spray adhesive


He Is Risen


My next card features the Big Chevies Cover Panel Confetti Cuts die in the background. 


He Is Risen


The Cross is layered over a Lacy Scallops Circle Confetti Cuts die-cut and the Easter Blessings sentiment is heat embossed in white.


He Is Risen

I die-cut two cover panels, one from white and one from a yellow polka dot pattern, then layered the negatives to the white chevrons for a more stripy look. I also trimmed down the perimeter of the white cover panel to get the blue outer mat.


Stamps: Easter Blessings

Dies: Big Chevies Cover Panel, Lacy Scallop Circles, Cross

Ink: Versamark

Paper: Reverse Confetti Cloud White card stock; Jillibean Soup Bowl of Dreams paper collection

Other: enamel dot, foam adhesive, white embossing powder, seam binding


Easter Blessings

And then the last one features the Striped Frame Cover Panel Confetti Cuts.

Easter Blessings

Here the Cross is layered onto a floral pattern Lacy Scallops Circle die-cut. I also topped the inner part of the cover panel with one of the dies from the All Framed Up Confetti Cuts die set, lightly inking it in yellow before adhering with foam tape for dimension.


Easter Blessings

The Easter Blessings sentiment is on the inside of their card, just a simple circle and band with a white embossed sentiment.

Stamps: Easter Blessings

Dies: Striped Frame Cover Panel, Lacy Scallop Circles, Cross, All Framed Up

Ink: Versamark

Paper: Reverse Confetti Cloud White card stock; Jillibean Soup Bowl of Dreams paper collection

Other: rhinestone, white linen thread, foam adhesive, white embossing powder


For lots more new release inspiration, visit the Reverse Confetti Crew:


Thanks so much for visiting!