Sunday, November 26, 2017

You're A Cool Friend - November SFYTT


I'm popping in today to share some Reverse Confetti Sketch For You To Try inspiration. The November sketch challenge is winding down, so be sure to get your entry linked up! All the sketch details are posted HERE on the Reverse Confetti blog.

Here's the November sketch:


I picked out the recently released Cool Friend stamp set for my card. Aren't these snowmen just the absolute cutest?! I'm also loving these two patterned papers together. Both are from the Cheerful & Kind 6x6 Pad.


I accented with a trio of Snowflake Trio snowflakes, each coated with some Clear Wink of Stella shimmer and topped with a black sequin.


Stamps: Cool Friend
Confetti Cuts Dies: Cool Friend, Lacy Scallop Circles, Snowflake Trio
Ink: black
Paper: Premier Polar White, Stone, and RC Aqua card stock; Cheerful & Kind 6x6 Pad
Other: Clear Wink of Stella, black sequins, Copic markers, white gel pen


Thanks so much for visiting!


Saturday, November 11, 2017

Introducing Winter Woolens & Snowfall Style

Surprise! I have the pleasure of joining Papertrey's November release countdown (and the next few months, too)! I'll be attempting to {partly} fill Dawn McVey's shoes while she continues her organ transplant recovery. If you're not already following Dawn's journey, follow her on Instagram: @dawnsing. She continually amazes me with her faith, strength, and overall positivity!

So, on to Papertrey's release countdown! It's Day Two already, so if you missed yesterday, you can get all caught up HERE

Today's featured products are Snowfall Style (stamps, dies, stencils), designed by Heather Nichols and Winter Woolens (stamps and dies), designed by Lizzie Jones. I have a few projects I'm sharing today!

All of the new products will be available on November 15 at 10pm Eastern Time in the Papertrey Ink store. 


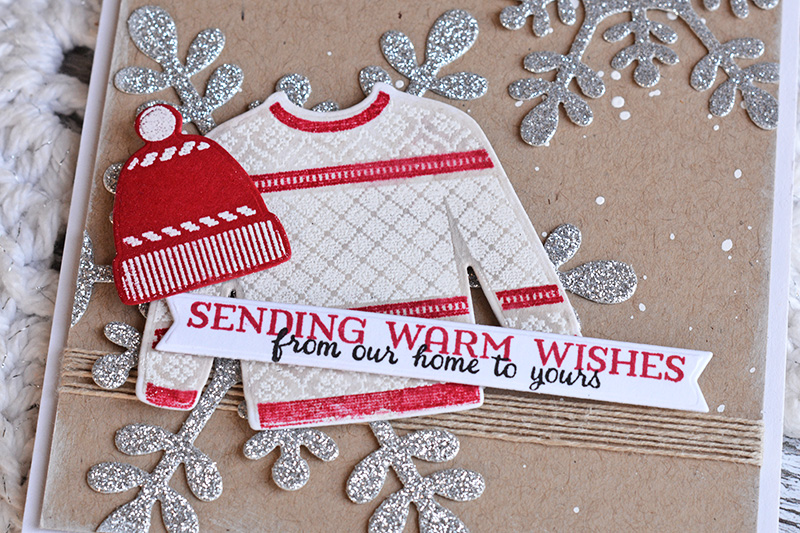
For my first card, I was inspired by the rustic, yet elegant Scandinavian style. I started with a Kraft background, added some white inking around the perimeter and white splatter, then wrapped some linen thread around the background panel a few times. I die-cut two Snowfall Style I snowflakes from silver glitter paper and placed them on the background, trimming off the overhang.


Next comes those darling Winter Woolens. Lizzie designed the set with multiple patterns that you can stamp onto a sweater, hat, and mittens. So fun to play with different pattern and color combos!

Here, I die-cut the sweater from smooth watercolor paper, stamped and white embossed the design, and watercolored with Soft Stone re-inker. I like the variegation in the sweater that I got with the watercoloring (as opposed to just white embossing onto Soft Stone card stock). Once the watercoloring was dry, I stamped the red lines. 


For the hat, I die-cut in Pure Poppy card stock, white embossed the pattern, then added some Pure Poppy shading to one side using a sponge dauber.

Lots of options for sentiments in this set, too. The three larger-font sentiments stand alone or can be mixed with the smaller script sentiments for even more variety. For example, you could make this a birthday card just by changing "from our home to yours" to "on your winter birthday." 

Stamps: Winter Woolens
Ink: Pure Poppy, True Black, Soft Stone, Versamark
Paper: Rustic White, Classic Kraft, and Pure Poppy card stock; 
watercolor paper; silver glitter paper
Dies: Winter Woolens, Snowfall Style I, *banner die coming later this release*
Other: natural linen thread, white acrylic paint, foam tape


Next is a monochromatic take using all those beautiful blues in the Papertrey color family. I started with a Dark Indigo (my favorite!) background panel and gave it a fine splatter using white acrylic paint. Next I die-cut a bunch of the Winter Woolens pieces and went to town stamping all the different colors and patterns.


I adhered the images randomly to cover the background, trimming off the overhang. Here the sentiment has been stamped onto a stitched banner (from the Tag Sale: Quilted die set).


For one last touch, I adhered some tiny acrylic snowflake embellishments in the open areas. 

Stamps: Winter Woolens
Ink: Spring Rain, Blueberry Sky, Enchanted Evening, Dark Indigo
Paper: Stamper’s Select White and Dark Indigo card stock
Dies: Winter Woolens, Tag Sale: Quilted
Other: white acrylic paint, acrylic snowflakes


And last up for today, I couldn't resist die-cutting those Winter Woolens from some of Papertrey's wool felt. Aren't they adorable?! I cut the hat and mittens from both Sweet Blush and Smokey Shadow felt, then just trimmed down the bands and layered them for contrast.


Behind the hat, mittens, and sentiment is another pair of the gorgeous Snowfall Style snowflakes. There are two different die sets: Snowfall Style I and Snowfall Style II, and each set comes with a large and a small die. Here I'm using just the small die from Snowfall Style II.


I adhered the snowflakes just in the middle, then pulled the points forward for some dimension. Everything is adhered to a stitched border Soft Stone panel, which has been splattered with white paint. 

Stamps: Winter Woolens
Ink: Sweet Blush, True Black
Paper: Stamper’s Select White, Soft Stone card stock; vellum card stock
Dies: Winter Woolens, Snowfall Style; Noted: Scalloped A2 Vertical
Other: Sweet Blush and Smokey Shadow felt, True Black baker’s twine, white acrylic paint


That's it for me today! For lots more Winter Woolens & Snowfall Style inspiration from the Papertrey team, visit the Day 2 Countdown post on the Papertrey Ink blog!


Wednesday, November 8, 2017

Reverse Confetti November Release Hop


It's Release Day at Reverse Confettiand we are blog hopping to celebrate! All of the new products are now available!


My project features several of the new products: Kitchen Love stamp set, Kitchen Love Confetti Cuts, Scalloped Squares Confetti Cuts, Small Diamond Tiles Cover Panel, and the Cheerful & Kind patterned paper pad.

I started with a white base that I splattered in lime green, hot pink and light orange. I die-cut two of the squares in the Scalloped Squares Confetti Cuts die set, stamped a sentiment on one, and then offset the nested pair on the card base, trimming off the overhang. Next, I added the mixing bowl, rolling pin and whisk. The bottom border is made up of two strips of Cheerful & Kind patterned paper and a white card stock strip that I cut from the Small Diamond Tiles Cover Panel.


StampsKitchen Love
Ink: Memento Tuxedo Black
Paper: Premier Polar white card stock; Cheerful & Kind patterned paper pad
Other: Copic markers


For lots more new release inspiration, visit the Confetti Crew:


Tuesday, November 7, 2017

Countdown to Confetti - Happy Winter


Hello, hello, welcome to the third and final day of Reverse Confetti's November release countdown. New products hit the Reverse Confetti store tonight at midnight ET!


Be sure to visit the Reverse Confetti blog for links to all the designers posting peeks today. Leave comments on each designer's blog for a chance to win a $15 Reverse Confetti gift certificate. Also, head over to the Reverse Confetti Facebook page for an additional giveaway. 


Today we are featuring Happy Winter. I'm loving these sweet winter hats with their reverse-type sentiments. The hat, tasseled strings, and pompom are all separate, which makes it easy to go crazy with color! I pulled my colors from the Cheerful & Kind patterned paper collection: Flamingo, Magenta, Tangerine, Baby Blue, and Parakeet. I love this bright, happy combo!


Check out the border image, too! I stamped a few rows in Stone ink onto the background for some subtle interest, then added that colorful striped patterned paper strip from the Cheerful & Kind collection. For accents, I added some of the larger nordic star images along with some colorful jumbo sequins. If this doesn't inject some color into the dead of winter, I don't know what will!


Stamps: Happy Winter
Confetti Cuts Dies: Happy Winter
Ink: Flamingo, Magenta, Tangerine, Parakeet, Baby Blue, Stone
Paper: Premier Polar White card stock, Cheerful & Kind 6x6 paper pad
Other: jumbo sequins, foam tape adhesive, corner rounder


Visit the Reverse Confetti blog for lots more Happy Winter inspiration!

Thanks for stopping by!


Monday, November 6, 2017

Countdown to Confetti - Sno Awesome


Welcome to Day Two of Reverse Confetti's November release countdown! Today's featured stamp sets are: Sno Awesome, seriously one of the cutest sets ever, and Kitchen Love, an utterly charming baking-themed set. 


Remember, all of the new products will be available in the Reverse Confetti store
at midnight ET November 8.


Be sure to visit the Reverse Confetti blog for links to all the designers posting peeks today. Leave comments on each designer's blog for a chance to win a $15 Reverse Confetti gift certificate. Also, head over to the Reverse Confetti Facebook page for an additional giveaway. 


My card for today features Sno Awesome, the Sno Awesome Confetti Cuts dies, the new Large Diamond Cover Panel, and a few patterns from the Cheerful & Kind 6x6 paper pad.

To start, I die-cut the Large Diamond Cover Panel out of white. Next, I inlaid some of the diamonds in Baby Blue and Stone card stock, as well as a green hexagon print from the Cheerful & Kind paper collection.


I used a combination of paper piecing and Copic coloring to put together the sno-cone. The sentiment is heat embossed in white on a Stone Tag Duo die-cut. The teeny tag with the heart cut-out is from the Flower Wrap Confetti Cuts die set. To get the icy look, I coated the ice with glossy accents and clear glass glitter.


Stamps: Sno Awesome
Confetti Cuts Dies: Sno Awesome, Large Diamond Cover Panel, Tag Duo, Flower Wrap, Edge Essentials
Ink: Versamark, Midnight
Paper: Premier Polar White, Baby Blue and Stone card stock; Cheerful & Kind 6x6 paper collection
Other: white embossing powder, glossy accents, clear glass glitter, white linen thread, foam tape adhesive


Visit the Reverse Confetti blog for lots more Sno Awesome, and Kitchen Love inspiration! Thanks so much for joining the Confetti Crew today!