Friday, October 27, 2017

Altenew Crafty Friends Winner


I've drawn a name for the $20 Altenew gift certificate giveaway from THIS POST

And here is comment #11:


Andrea S, please email me for instructions on how to claim your prize!


-Amy

Thursday, October 26, 2017

For A Special Friend - October SFYTT

For A Special Friend

Hey there, just stopping by today to share my take on this month's Sketch For You To Try from Reverse Confetti. We'd love to have you play along! Just link up your entry by noon CST on Sunday, October 29. All the details and the link-up are posted HERE on the Reverse Confetti blog.

Here's our October sketch:


For A Special Friend

I started with some of the adorable images from Nuts About You, die-cut them with the coordinating Nuts About You Confetti Cuts dies, and colored with Copics. I arranged the images onto a pair of tags that I cut with the Tag Duo Confetti Cuts. For the horizontal strip element the sketch (the taupe/gray rectangle), I tucked in two branches (also from Nuts About You).


For A Special Friend

For the larger horizontal band, I opted to give a hint of a scene with the grassy slope die that's included in the Nuts About You Confetti Cuts set. The final touches were some loops of black and white baker's twine through the tags and a pair of subtle white-on-white clouds (die-cut with the Sun 'N Clouds Confetti Cuts die set). 


Stamps: Nuts About You
Confetti Cuts Dies: Nuts About You, Tag Duo, Sun 'N Clouds
Ink: Memento Tuxedo Black
Paper: Premier Polar White, Avocado
Other: black/white baker's twine, Copic markers


Thanks for visiting!


Saturday, October 21, 2017

Queen & Co Halloween Hoopla

Hey there, a little more Queen & Co. Halloween Hoopla inspiration for you. I have absolutely loved working with all the colors, patterns, and shakers in this collection!

I Put A Spell On You

For my first card, I've featured the cauldron shaker shape and a background of layered patterned paper waves. When I'm mixing a lot of different papers, I try to alternate between smaller and larger patterns and between tone-on-tone patterns and more colorful patterns. The tone-on-tone patterns act as solids and give the eye a place to "rest." They often show off focal elements best as well.


I Put A Spell On You

I die-cut the cauldron out of dark gray and black card stock. Before filling the cauldron shaker, I added a wavy layer of green patterned paper in the background to give the effect of a potion gurgling and bubbling. Also rolling around down in that potion are various Halloween Hoopla toppings including the green eyeballs, spider webs, and purple and orange beads. Bubbling up from the potion are orange and purple Iridescent Bubbles.


I Put A Spell On You

I hand-stitched some steam lines coming up from the cauldron, as well as several more Iridescent Bubbles. The sentiment is stamped on a vertical strip of the graph paper pattern and accented with green and white twine.


Witching You A Happy Halloween

For my next card, I've combined colorful background patterns with an offset witch's hat focal point shaker element.


Witching You A Happy Halloween

I filled the shaker with an assortment of purple toppings and embellished with a Purple Sparkle String bow.

I am loving the Iridescent Bubbles. They're kind of like the best of enamel dots and sequins rolled into one embellishment! Here I've used three of them to accent my stamped sentiment.


Supplies: Halloween Hoopla, Purple Sparkle String


So glad you stopped by today!


Thursday, October 19, 2017

I'm on Confetti Camera!

Hello friends, please join me on the Reverse Confetti blog today for a Confetti Camera double feature with Lisa Henke!

The current Confetti Camera theme is favorite color palettes. I've been having so much fun putting together color combos with Reverse Confetti's new ink colors. I hope you'll pop over there to see my non-traditional fall pumpkin arrangement! Here's a little peek for you:


Hope you're having a great week!


Tuesday, October 17, 2017

Altenew Crafty Friends Blog Hop + Giveaway


Hello friends! I'm excited to be part of Altenew's 2-Day Crafty Friends Blog Hop + Giveaway. If you're already hopping with us, you'll have arrived here by way of Galina Filippenko. If not, be sure to head over to the Altenew Card Blog to begin! And when you're finished here, you'll visit Papercraft Magazines next (I'll link again at the end).

Today's hop is all about celebrating our unique community and all that it means to us! We have lots of sponsors and prizes and special offers, so stay tuned for that in a bit.

I can still remember seeing a hand-stamped card for the very first time. A friend of mine came in to the Little Gym class our kids were attending waving it around saying "I MADE this." (That was at least 15 years ago, only because the preschooler I was taking to the gym class is now 17!) I really do believe I was hooked on card making that instant. That magic never gets old! Little did I know then that the real blessing would be the online (and sometimes in-person) community that has built up around this hobby. I was shy and very slow to put myself out there in the online community. It actually took me four years to work up the courage to post a card of my own. Now I realize that every day I chose to watch instead of participate was just another day I missed out on the joy, support, and camaraderie of our community! 

I've put together two projects for today, both featuring the Fantasy Floral Die Set and the More Than Words stamp set. 


As soon as I saw the Fantasy Floral Die Set I wanted to watercolor those die-cuts! That layered effect of the flower dies is gorgeous.


 I die-cut these from watercolor paper, used used Zigs to color, and added some splatter after everything had dried.


For the background, I spritzed the watercolor paper with water, then scribbled Zigs on an acrylic block and smooshed to the watercolor paper. After I let that dry, I lightly splattered with a metallic gold mist. Last, I stamped one of the More Than Words sentiments in black.


This next card was a bit of an accident. I had stamped the beautiful Charmed image onto watercolor paper, intending to watercolor that image. But when I happened to lay the watercolored Fantasy Floral  die-cuts down on top, I ended up really liking the simple black-and-white Charmed line art as a background pattern. 


I added a strip of black and white striped paper along the right, the More Than Words sentiment, and some clear sequins to finish.


And now for some special offers, prizes, and a giveaway:


Special Offer
FREE U.S. shipping with code CRAFTY or $5 OFF international shipping with code FRIENDS at checkout. Offer valid from October 17th at 12:01 am EDT through October 19th at 11:59 pm EDT. Not valid on prior purchases. Cannot be combined with other promo codes.


Prizes
Altenew is giving away a $100 Altenew prize pack to FIVE lucky winners. There are also 13 awesome companies/magazines who are offering the following prizes:

Jennifer McGuire Ink: 1 prize pack of three Altenew stamp sets
Online Card Classes: 3 class spots
Create and Craft TV: £50 gift certificate
My Sweet Petunia: Mini MISTI
Ellen Hutson LLC: $30 gift certificate
Pretty Pink Posh: $30 gift certificate
Simon Says Stamp: $30 gift certificate
Chameleon Pens: 1 pack of 5 Chameleon pens
Tombow USA: 1 pack of 10 dual brush pens
WOW! Embossing Powder: $25 gift certificate
Butterfly Reflections Ink: $25 gift certificate
Freckled Fawn: $20 gift certificate
Papercraft Magazines: One copy of each of the latest issues of four magazines
Scrapbook & Cards Today Magazine: 1-year subscription


Be sure to leave comments by Friday, October 27th, 2017 at 11:59 PM EDT for a chance to win! 21 WINNERS will be chosen at random from the comments left on all of these blogs listed below and will be announced on the Altenew Card Blog and Altenew Scrapbook Blog on October 28th, 2017


Giveaway:
And last, leave a comment here on my blog by 11:59 Eastern Time on Thursday, October 26 for a chance to win a $20 gift certificate to Altenew. I will post the winner here on Friday, October 27. Good luck!

For more Crafty Friends inspiration, visit all the stops on the hop:


Thanks so much for visiting today, and thank you Altenew for having me!


Thursday, October 12, 2017

It's All About the Candy Corn

Hi there, I'm over on the Queen & Co blog today with a pair of cards featuring the Halloween Hoopla Kit. and thought I'd share them here too. I can't even begin to tell you how much fun I'm having with this kit!


The toppings are especially cute -- pumpkins, jack-o-lanterns, candy corn, spider webs, and more!


It's All About the Candy

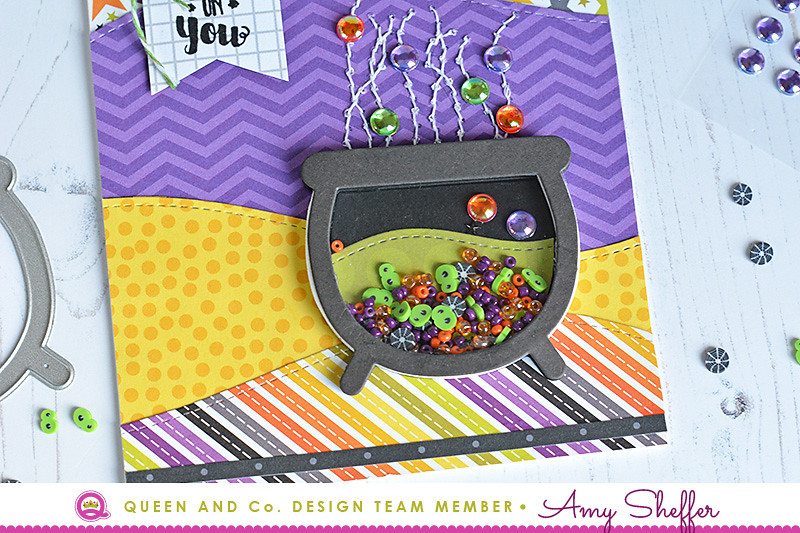
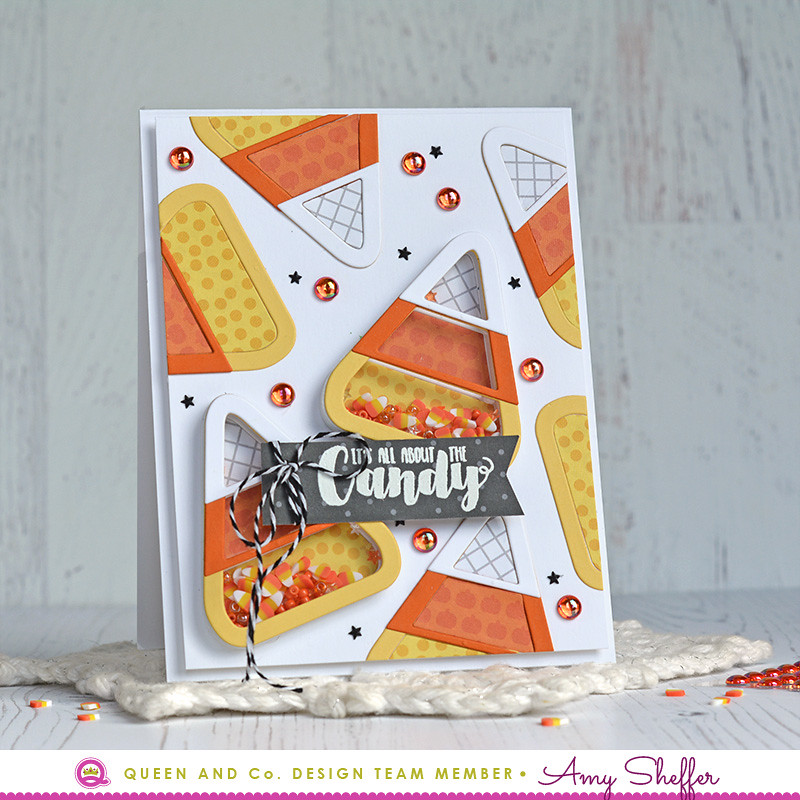
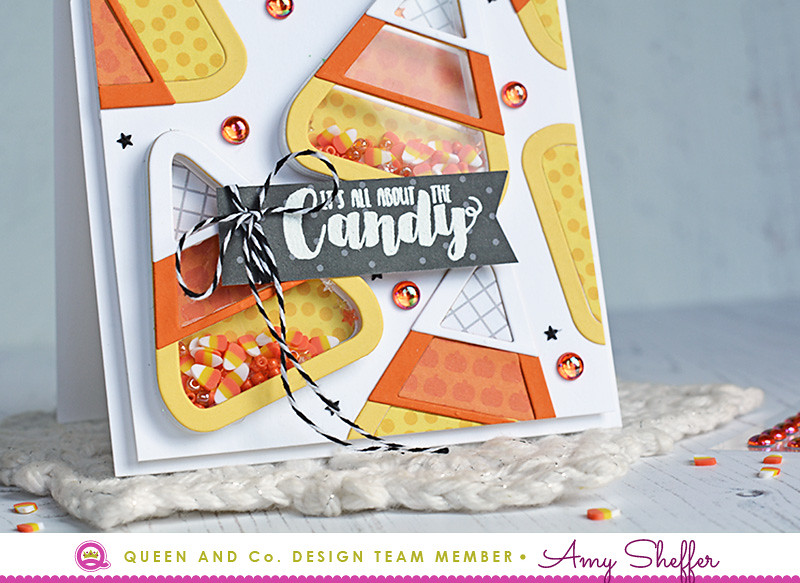
I had to start with my favorite: candy corn, and why stop at just one?


It's All About the Candy

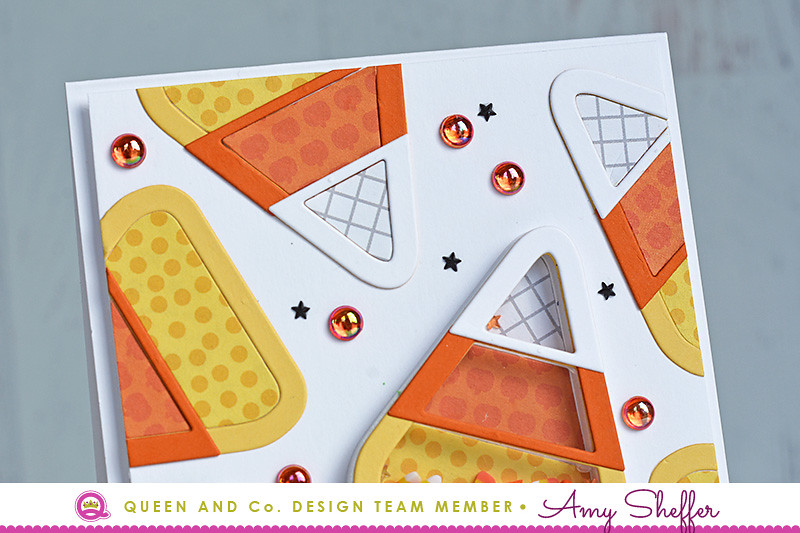
I started with two candy corn shakers, and then surrounded those with several more flat candy corn pieces. The candy corn are so easy to assemble thanks to the trio of dies that go with this shaker shape. I created my shaker frames from white, orange, and yellow card stock, then backed each section with papers from the Halloween Hoopla paper pad. Last, I filled each shaker with a mixture of candy corn toppings, beads, and stars. 

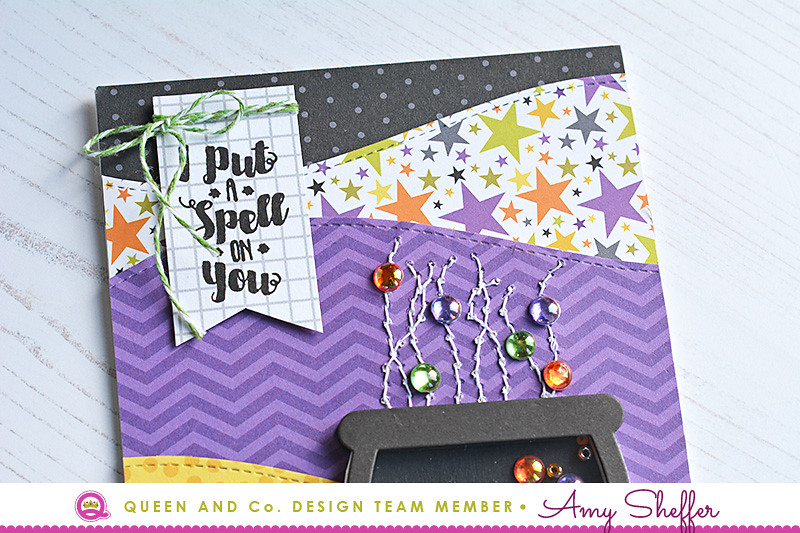
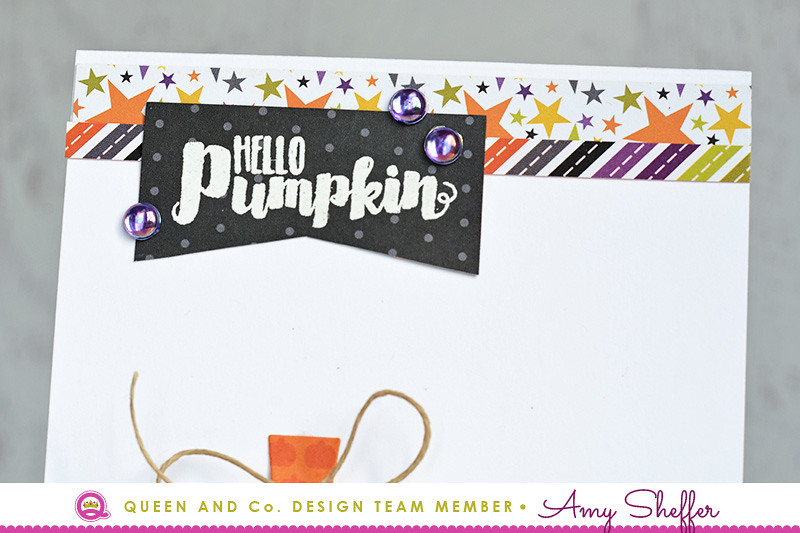
I found the perfect sentiment in the Halloween Hoopla stamp set, white embossed it on the black polka dot Halloween Hoopla pattern, and accented with black and white twine.

It's All About the Candy

To add to the fun, I added a scattering of the Orange Iridescent Bubbles and the tiny black stars.


Hello Pumpkin

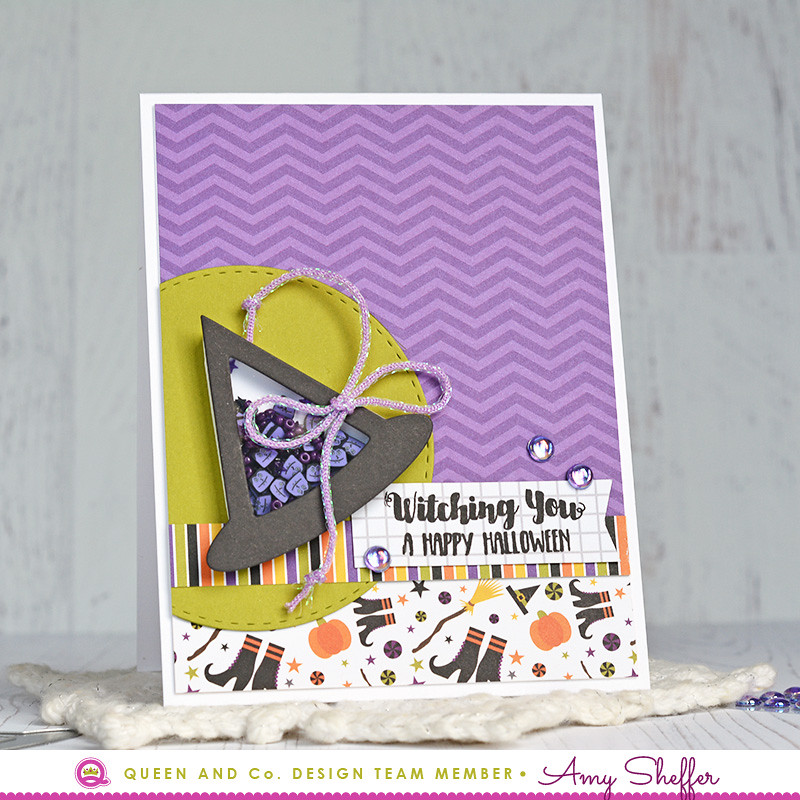
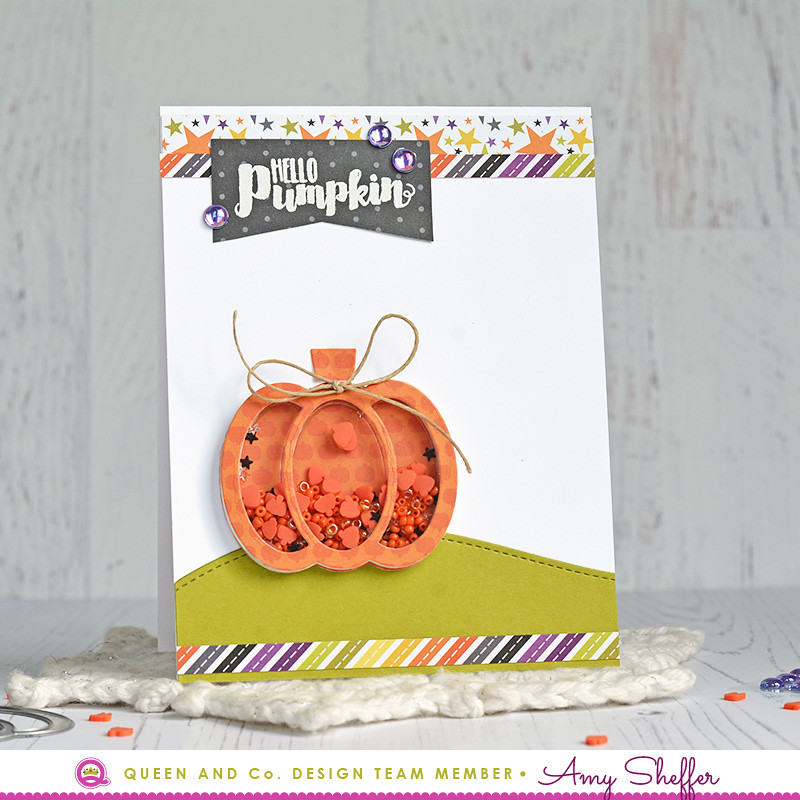
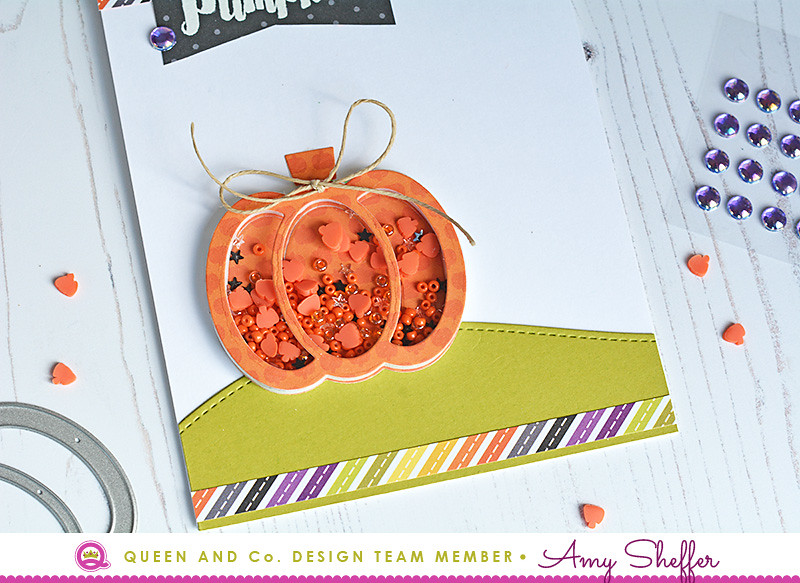
Next up is a simple and sweet scene card that could work for both Halloween or fall in general. 


Hello Pumpkin

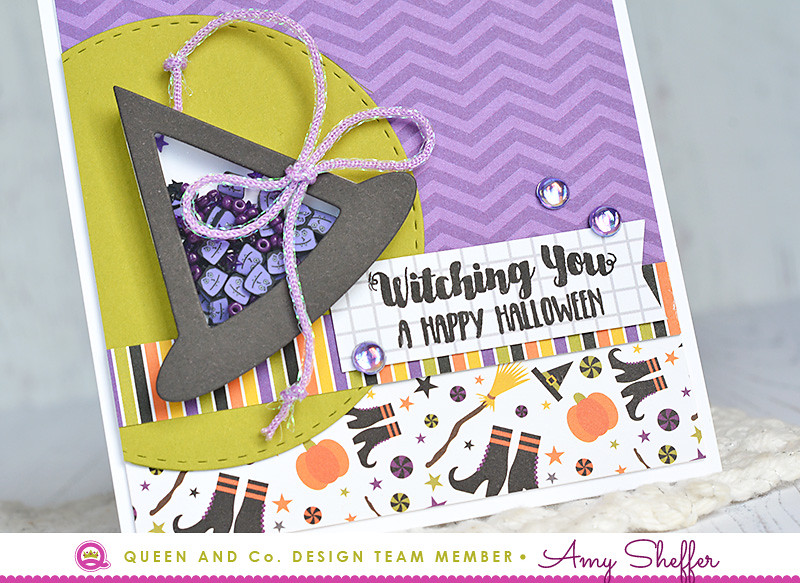
Here I've die-cut a patterned paper pumpkin and filled it with a mixture of orange toppings and just a few of the black stars for a little pop of contrast. The narrow strips of patterned paper manage to add a ton of color while maintaining lots of overall white space.

Hello Pumpkin

The sentiment, once again, is white embossed on the black polka dot pattern. A few more strips of colorful patterned paper and a trio of Purple Iridescent Bubbles (included in the kit) completes the card.


Thanks so much for stopping by! 


Sunday, October 8, 2017

Papertrey Ink Traveler's Journal: Mini Scrapbook Kits


It's Traveler's Journal day over on the Papertrey Ink blog! This month's feature is all about making mini scrapbooking kits, either as gifts or for yourself. 


I've always found the idea of a December mini-album enticing, but the reality is I've never felt I've had the time to put one together. Today I'm sharing some ideas for how you can prepare supplies ahead of time and simplify December memory keeping.  Papertrey's Traveler's Journal booklets are the ideal size for a December mini-album or journal!


The first thing I did was choose a color combo to use throughout my book. I designed a simple, but colorful album cover using those colors. The letters are all die-cut with Headline Alphabet, the word "memories" is from the Monthly Moments: Year-Round Mini stamp set, and the number "ornaments" are from the Traveler's Journal: Dates stamp set.


You'll need either an elastic band closure or a clip. Otherwise, the booklets don't stay closed on their own. I added a label sticker to a gold binder clip, along with some festive Pure Poppy baker's twine. The label was done with the Traveler's Journal: Typed Notes stamp set, Moments Inked: Planner Banners stamp set, and Moments Inked: Planner Banners die.


On the first page, I set a merry tone with some red polka dot paper and a stamped "Merry & Bright" sentiment from Quick Notes: Holiday Mini.


I added some gradient with a darker shade of green ink, popped the sentiment up with foam adhesive, and added some gold sequins for a little extra pizzazz.


Next I chose a theme for the album. I picked out a dozen prompts and created a spread for each one. I die-cut several photo frames in various colors to have ready for photos, and I've left plenty of room for telling stories, recording traditions, and/or reflecting on the prompt.

The prompts I'm using are: selfie, family, ornament, cookie, holiday card, decor, peace, shopping, listen, lights, and weather. 

The frame is from the Traveler's Journal: Accessories die set, and the titles are all done with the same Headline Alphabet die that I used for the cover.


Next, I stamped and die-cut an assortment of images to use for embellishments. My advice is to not go too crazy with these. Keep it simple! These adorable trees are from the Treetops Glisten stamp set.


Here's an example of how you could add your stamped embellishments.


I also have a stack of snowflakes ready to go. These are from the Snowflake Sparkle set.


And here's another simple page design for the "family" prompt. I adhered the title to the frame with permanent adhesive, but used repositionable adhesive for the actual frame to make it easier to insert those printed photographs. The square frame on this spread is from the Traveler's Journal: Outer Cover die set.

I hope by planning ahead and simplifying the process, I'll be able to stick with a December mini-album project this year! If you don't already have a system you use, hopefully you're inspired to try as well!


Ink: True Black, Fresh Snow, Tropical Teal, New Leaf, Soft Stone, Pure Poppy, Aqua Mist, Green Parakeet

PaperTraveler's Journal Page Blanks  Bitty Big: Pure Poppy Paper Collection; Pure Poppy, Aqua Mist, Green Parakeet, Tropical Teal, Soft Stone, Classic Kraft, and Stamper's Select White card stock

Other: white gel pen, Pure Poppy baker's twine, gold sequins


For more Traveler's Journal inspiration, be sure to visit the Papertrey Ink blog.
Thanks for visiting!


Reverse Confetti October Hop


Hello, friends! It's the 8th of the month, and the Reverse Confetti Crew and friends are hopping. Welcome! So glad you're here! To start at the beginning, visit the Reverse Confetti blog. When you're finished here, you'll hop over to Kathy Schweinfurth (full hop order below).


I have an autumn card to share today that I made using a number of the new products from last month's release. 


I started my card with a wreath and fall florals that I stamped with Fall For You, die-cut with the coordinating Fall For You Confetti Cuts dies, and colored with Copics.


Behind the wreath is a strip of yellow patterned paper from the Every Little Bit paper pad stamped with a sentiment from Autumn Blessings. For the background, I went with a tone-on-tone Leaf Lattice Cover Panel Confetti Cuts die-cut in Dark Roast card stock over a Dark Roast card base. Before adhering the wreath, I added some brightness with some light white splatter.


Stamps: Fall For You, Autumn Blessings
Confetti Cuts Dies: Leaf Lattice Cover Panel, Fall For You
Ink: Memento Tuxedo Black
Paper: Premier Polar White and Dark Roast card stock; Every Little Bit 6x6 paper pad
Other: hemp cord, Copic markers, Mister Huey Opaque White


For more Reverse Confetti inspiration, visit the Confetti Crew and friends:


Thanks so much for visiting!