Wednesday, May 1, 2019

Be Still & Know - The Greetery


Happy Wednesday, friends, and happy May! I promised more Fleur Impressions + Comforting Commands projects from The Greetery, so let's get going on that! 

But first, a quick tip: many of The Greetery's first release products sold out quickly (congratulations Betsy!). Be sure to sign up for email notifications for the products you're interested in, that way you'll be the first to know when those items are back in stock.


I had so much fun stamping various color combos for these layered flowers. Each flower image has either two or three layers, plus the centers (and not including the leaves). These pinks and reds look especially beautiful against the crisp white background!


There are four different scripture sentiments in Comforting Commands. Of the five cards I've made so far, three of them used "be still and know." I didn't do that on purpose, so it's interesting to see how that one Scripture seemed to emerge as my favorite. It's been a difficult year so far, so it certainly resonates! For this card, I stamped in black pigment ink and heat embossed in clear for a little extra pop.


I just *love* these two sets!

Have a great rest of the week!


Affiliate links used where available at no extra charge to you.
Many thanks for your support!

Tuesday, April 23, 2019

The Greetery Launch Week Day 2: Fleur Impressions and Comforting Commands


Hello friends, this week is super exciting. Why? It's launch week for Betsy Veldman's new stamp company, The Greetery. Betsy is an amazing, innovative artist and one of the most creative (and genuinely kind) people I know. I'm beyond thrilled to see where she goes with this new venture!

The Greetery store will officially open for business on Friday, April 26 at 10am Eastern. 

Be sure to follow The Greetery blog as well, and connect on social media: @the_greetery on Instagram, and The Greetery on Facebook. 

Today is Day Two of the first release countdown, and I am honored to help introduce FLEUR IMPRESSIONS, a beautiful layered floral stamp set with coordinating dies, and COMFORTING COMMANDS, a hand-lettered Scripture set, also with coordinating dies. 


Isn't everything just so beautiful?! 

I started out by ink-blending a striped background with Scattered Straw and Spun Sugar Distress Oxide inks. For added interest, I diecut it with stitched rectangle dies and popped up the inner piece.


Look at that beautiful lettering! COMFORTING COMMANDS has four large Scripture sentiments, along with a handful of supporting stamps for finishing the sentiment or adding the Scripture reference.


I've been loving my Distress Oxide inks so much lately, but especially here on these FLEUR IMPRESSIONS flowers. Because of the pigment formulation, I was able to layer lighter inks on top of darker inks, rather than the usual light-to-dark progression of dye inks.

Each of the floral images has three or four layers, and they were quite easy to line up. In addition, there are a few smaller leaf-only images perfect for tucking in here and there to form larger floral arrangements.


Stamps: Fleur Impessions, Comforting Commands
Dies: The Greetery Fleur Impressions and Comforting Commands; 
Simon Says Stamp stitched rectangles
Ink: Scattered Straw, Spun Sugar, Picket Fence, Worn Lipstick, Mustard Seed, 
Fossilized Amber, Shabby Shutters, Peeled Paint, Pumice Stone, Hickory Smoke, Black Soot
Paper: Neenah Solar White
Other: ink blending brushes, masking tape, white sequins


My next card features the same warm pink and yellow color combo, this time with a different COMFORTING COMMANDS sentiment. I started by ink-blending the background using a cloud stencil.


I added a little bit of Distress Ink splatter, then spritzed the whole panel with shimmer spray. The shimmer is so beautiful in person!


I popped up the sentiment with foam tape, then accented with White Nuvo Drops.


Stamps: Comforting Commands
Dies: The Greetery Comforting Commands
Simon Says Stamp stitched rectangles
Ink: Scattered Straw, Spun Sugar, Picket Fence, Worn Lipstick, 
Mustard Seed, Fossilized Amber
Paper: Neenah Solar White
Other: ink blending brushes, Simon Says Stamps Clouds For Days stencil, White Nuvo Drops


Not to be a tease, but I couldn't stop creating with these beautiful products, so I will have lots more to share with you in the days and weeks ahead. 

But for more FLEUR IMPRESSIONS and COMFORTING C'OMMANDS inspiration *right now,* visit The Greetery blog and today's guest designers:


Thanks for visiting!


Affiliate links: If you make a purchase using these links, I'll receive a small commission at no extra cost to you. Thank you for your support!

Monday, April 8, 2019

Reverse Confetti April Hop - Easter Bunny Treats


Welcome to Reverse Confetti's April Blog Hop! You have likely arrived here from Amy Kolling's blog, and you'll head to the talented Tricia Barber's blog next. If not, you can begin the hop at the Reverse Confetti blog. I'll have the full hop order at the end of this post.


For today, I've put together some Easter Bunny treats using some various RC goodies. I adhered two STITCHED HEX TAGS together along just the sides, decorated the face as a bunny, and used it as a treat sleeve. So easy!

To create the bunny's eyes, I layered three circle dies and used a fourth tiny circle to made highlights on the eyes. From big to small, the circle dies I used are: DETAILED CIRCLES, CIRCLE WISHES (ink-blended with ICED AQUA ink) DOTS TAG LAYER, and another CIRCLE WISHES for the tiny cut-out.


The ears were done with the MOD FLORAL STACK Confetti Cuts dies. I used the largest and smallest dies, cut the die-cut in half and layered them together.


On the gray bunny, I added the "happy easter" tag. The sentiment is from HIPPITY HOPPITY, and the tag is from the BOX WRAP Confetti Cuts set.


I cut three lengths of string for whiskers and adhered the thread behind a wood veneer flower. I sponged on some rosy cheeks with PIGGY BANK ink, then hand-drew the mouth using a black pen. TIP: trace around a small circle die to get perfect curves for the mouth (the white bunny is freehand, the gray one is traced, see the difference?!)


Thanks for visiting!


If you make a purchase using these links, I'll receive a small commission at no extra cost to you. Thank you for your support!

Friday, March 8, 2019

Reverse Confetti March Release Hop


Welcome to Reverse Confetti's March Release Blog Hop! 

All of the new products now available in the Reverse Confetti store.

7 stamp sets
11 Confetti Cuts dies
1 6x6 paper pad 


Join the Confetti Crew today for a blog hop to celebrate. The hop begins on the Reverse Confetti blog. You should have arrived here from Julee Tilman's blog, and you'll head to Tricia Barber's blog next. (The full hop order is down below, too.)


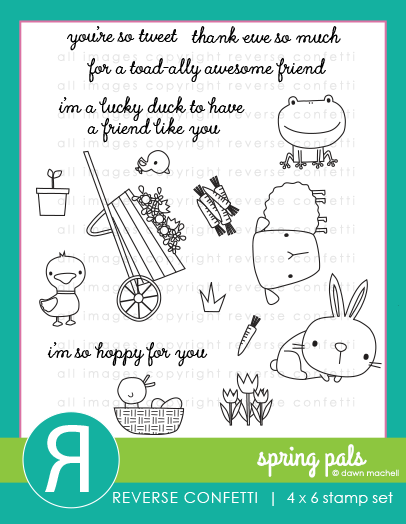
For today's project, I combined SPRING PALS with the super cute YOU'RE SUPER DUPER Confetti Cuts. This would make a cute kids' Easter card or just a pick-me-up card for "kids" of all ages! I love the look of these large sentiment die-cuts, and the size of the SPRING PALS critters is perfect for making little groupings around the sentiment.


I made three different critter groupings, then added a WORD UP sentiment to each one. "Love to love you" is one of my favorites in WORD UP, and I placed it next to the little duck kissing the frog.


In another corner, the sweet mama duck is peeking out from behind some tulips.


And then the third grouping is the bunny, another baby duck, and some carrots. 


For the background, I ink-blended some yellow inks onto a STITCHED RAYS COVER PANEL die-cut, then cut out the sentiment with the YOU'RE SUPER DUPER Confetti Cuts, then layered that onto a card base that I very lightly ink-blended with some light aqua ink.


For more new release inspiration, visit the Confetti Crew, 'Fetti Friends, and special guests:


Affiliate links used wherever available. If you make a purchase through these links, I receive a small commission at no extra cost to you. I appreciate your support!

Thursday, March 7, 2019

Reverse Confetti March Countdown - Floral Gem + Sentimental Gems


It's the third and final day of Reverse Confetti's September release countdown - welcome!

Today's featured products are FLORAL GEM and SENTIMENTAL GEMS.

All of the new products will be available for purchase at midnight (ET) tonight.


 Don't miss our two chances to win a Reverse Confetti gift certificate: 1) Leave comments on each designer's blog; 2) Head over to our Reverse Confetti Facebook page for an additional giveaway. 


Sigh ... what a gorgeous floral set!


I started by stamping the main image from FLORAL GEM as well as all the separate layering florals onto some Cloud White card stock. I colored everything in softer colors with my Zig markers, then layered everything together.


I stamped a simple sentiment from SENTIMENTAL GEMS at the bottom and accented with more florals and the bee from HAPPY BEE DAY. Last touch was some gold splatter. These images don't require much! 


Thanks for visiting!


Affiliate links used wherever available. If you make a purchase through these links, I receive a small commission at no extra cost to you. I appreciate your support!