Wednesday, January 20, 2016

Reverse Confetti Special Release


Reverse Confetti has a mid-month special release treat for you today! Join the Confetti Crew and some super special 'Fetti Friends for today's blog hop showing off these new goodies. 


The special mini release includes In The Bag Confetti Cuts, which is a die set custom-designed to fit the new Clear Tote Bags. In the Bag comes with six tote bags, and the tote bags will also be available separately in packages of six. Along with those products is the Layered Bow die set, a unique take on bow-making dies. 

I love the Clear Tote Bags and haven't seen anything like them before. They are similar in size to small rope-handled bags, only they're made of clear plastic, and instead of handles, they have a nice flap closure.


With the recent release of S'more Love, I've been itching to make a s'mores kit. The Clear Tote Bags are a perfect fit !


I die-cut the In the Bag decorative liner piece out of vellum, then attached a rectangle black/white back piece before slipping it down into the bag. After I filled the bag with the s'mores ingredients, I closed up the bag and did the rest of the decorating on the outside of the bag.

The green background is attached to the bag front. Next, using Strawberry Twine, I tied on a tag that I cut using two of the tag dies included in In the Bag. The sentiment is stamped on the tag. The penguin, s'mores stick and fire are stamped, die-cut, colored with Copics, and adhered with foam tape.


The Layered Bow is fabulous and super versatile. The "tails" can be arranged wherever you like, and the outline layer can be added or left off (I left it off).


Each half of the bow is cut separately, which is nice because it gives you a little bit of play on how wide to make your bow.


My black and white backing piece was a two-sided print, and the other side that showed through to the back didn't work at all, so I cut a second back out of the same green used on the front and just adhered it to the back of the black/white piece. This would be a good place to add a message, instructions (does anyone really needed for s'mores, though?), or tuck in a small notecard (bag width is 4", so it would need to be a little smaller than A2).

Sweet! I can't wait to fill these bags with all sorts of goodies -- I have so many ideas!


STAMPS: S'more Love

CONFETTI CUTS DIES: In the Bag, Layered Bow, S'more Love

INK: Memento Tuxedo Black

PAPER: white card stock, vellum card stock, watercolor paper, My Mind's Eye My Story 6x6 collection, Basic Grey Sunkissed 6x6 Collection 

OTHER: Strawberry Solid Twine, dark gray button, Copics, foam adhesive


For lots more inspiration, visit the Confetti Crew and 'Fetti Friends:

Thanks so much for visiting!

Friday, January 15, 2016

New! Moments Inked: Binder Page Die

Hey, hey, hey, we're not quite finished with the Papertrey January release. There one more January product to introduce: Binder Page Dies for the Moments Inked Planner! Yes!!


The Binder Page die set comes with three different dies. The large is a full-size planner page. The medium *perfectly* holds the 3x6 white Post-Its (or two 3x3's). And then there's the small one, which die-cuts a horizontal strip and attaches to only three of the binder holes. 

I dove right into these dies, so let me show you what I'm doing with them:

First ... the full-page die @ approximately 5 1/4" x 7"
Perfect for adding extra sections (dividers and pages), perfect for creating planner dashboards, perfect for creating "cover" pages (not really the cover obviously, but whatever you call that first page you see when you open your planner).


I die-cut a full-size page from one of those plastic two-pocket folders. I just happened to find some aqua ones at Five Below back in August, and I grabbed all that they had! 


Since it's plastic, it's sturdy and durable, which works well for any planner page you'll be handling a lot, like section dividers.

Depending on your die-cutting machine and the thickness of the folders, you may not be able to cut all the way through the plastic. In that case, it's pretty easy to use an X-acto knife to finish the cutting. The partial cut creates a "channel" that you can use as a guide. (My folder cut all the way through with a Big Shot, but only if I used the precision plate.)

Also, if your dies warp ...


... just gently bend them back ...


Next, the medium die @ approximately 3 5/8" x 6"

If you saw my 2016 planner review post, you saw that I was using a temporary spiral-edge Listed die-cut to hold my Post-It note to-do lists, as shown below:


That was less than ideal and only until something better came along. The medium Binder Page die is that something better! 

So here's my to-do list now:


And last but not least, the small die at approximately 2 3/8" x 5".

 This is a fun size! These little pages are great opportunity to keep something visible without covering up the whole weekly spread.

I created a laminated "Today's Top Three Tasks" page to keep right in with my weekly spread. It's a great visual reminder to help you tackle the right things first each day. 


You can write on this with a wet-erase marker and re-use it day after day. You can also write on it with a Sharpie (like I did) and just use an alcohol wipe to remove it.


I also made a page for extra pen/pencil storage using the small Binder Page die and the Write Stuff Holders dies. I cut this page out of the plastic two-pocket folder as well, since the pen holder is going to need to hold up to wear and tear. 


The Write Stuff Holders are taller than the small page so I die-cut the top loop first, then repositioned the die and cut the bottom loop.  

By the way, the first one I made was with laminated Sheer Basics vellum. The laminating separated from the vellum where I die-cut the loop and the vellum tore easily, so I recommend against using that.


You might be wondering how much bulk the extra pen storage adds. Although the planner will still close with the pen holder page in there, it's really tight and will probably leave indentations, so I recommend removing pages if you want to accommodate extra pen storage. You could remove the monthly pages for July - December, for example, just leaving the monthly divider page and monthly spread for times when you need to do future planning. Or you could do a 3-month approach -- previous month, current month, next month.


One last look at the medium and small pages that I'm using for my to-do list.


Here's a little bonus content -- this week's bible verse. I hand-lettered the verse and decorated with hearts from Noted and the flowery vine from Choose Joy.


I posted last week's verse on Instagram and hope to continue posting there each week. I'm @amyksheffer on IG if you want to follow along!


Papertrey January Release in Review

I've got a few more fun projects to share using Papertrey's January release.

All of the new products will be available tonight at 10 pm EST in the Papertrey Ink store.


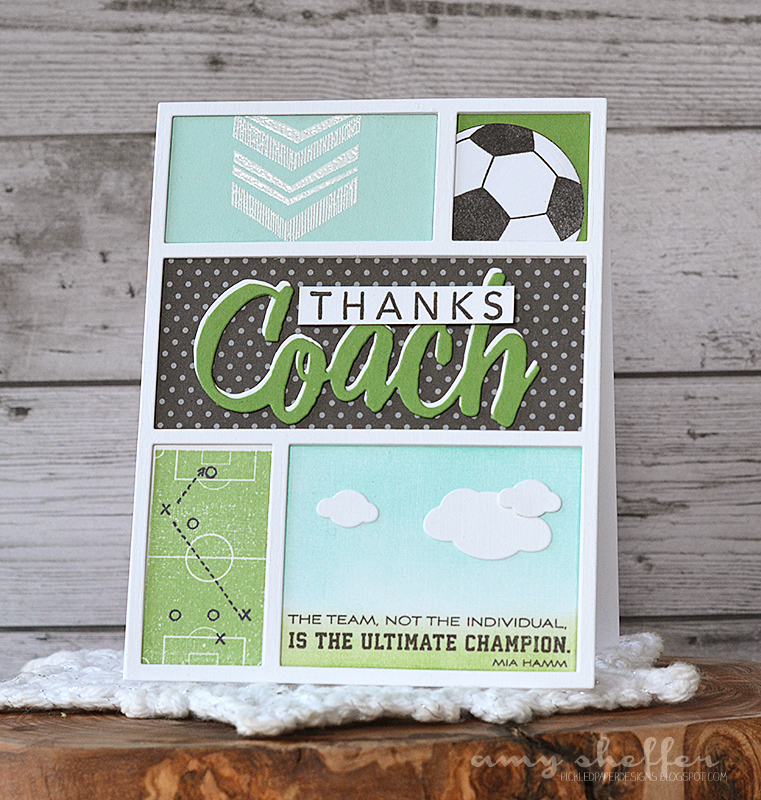
Lizzie's Go For the Goal and Nichole's Thanks, Coach pair up beautifully. I had so much fun filling  the Comic Strip Cover Plate sections with different images and die-cuts. In the center, the word "coach" is die-cut twice, once in New Leaf and once in white, then layered and offset to create the highlight effect. I LOVE the little field image for diagramming plays -- so clever!


I layered a couple of the Comic Strip Cover Plate die-cuts so that the individual panels would be recessed.


It's always fun to pull design element images from other sets and make them work in new ways. The arrows in the top left panel are from the Ribbon Slider Sentiments stamp set.


STAMPS: Go for the Goal, Thanks, Coach, Ribbon Slider Sentiments
DIES: Thanks, Coach; Cover Plate: Comic Strip, Scene It: Skyscapes (clouds)
INK: Aqua Mist, New Leaf, True Black, Versamark
PAPER: Fresh Snow linen, Stamper's Select white, New Leaf and Aqua Mist card stock; True Black Bitty Dot patterned paper
OTHER: white embossing powder, ink blending tool


This next card features Nichole's Keep It Simple: Baby and Lizzie's Background Basics: Splats. I modified one of the splats borders into an animal print pattern. Super easy to do: first, I stamped the large splats pattern in Dark Chocolate, then I added the black spots with a black marker. Think of all the different color combos you could do!


The felt onesie was die-cut from Sweet Blush felt using the Bitty Baby Blessings dies. The faux snap bottom was a fun detail -- I diecut a small circle with stitch holes using one of the dies in the Stitched Medallion I set, then placed the die-cut at the "bum" end of the onesie die, overhanging so that it would cut just that little semi-circle. Little details like that are always so fun to do!


On the inside, I added a sentiment from Dawn's Tucked In: Baby set. For a little touch of color, I added the pink decorative image, which is from the Center Style: Feminine stamp set. The sentiment has a tiara!


STAMPS: Keep It Simple: Baby; Background Basics: Splats; Center Style: Feminine
INK: True Black, Dark Chocolate Sweet Blush
PAPER: Stamper's Select white; Black & White All Over paper collection
OTHER: ink blending tool, black Copic, Dark Chocolate buttons, True Black baker's twine, Sweet Blush and white felt


I used Nichole's Outlined stamp set to create an abstract background. I stamped, heat embossed in white, and then watercolored. 


The sentiment was done with Wonderful Words: Hello stamps and dies. 


STAMPS: Outlined, Wonderful Words: Hello
INK: VersaMark
PAPER: watercolor paper, white cards stock, vellum
OTHER: white embossing powder, watercolors, True Black baker's twine, black enamel dot


When I first saw Dawn's Bold Blossoms set, with both the solid and outline images, I knew I wanted to try the offset look. Verdict: I think it's fun and looks cool, but I sure hope it's obvious that it was on purpose! Otherwise, that would be some really, really bad stamping :D

You know, it's funny, I come from a print publication background, where something like this would be a major disaster. Here in the artsy world, though, anything goes!


I added some very subtle Background Basics: Splats stamping in Soft Stone along the left border.


STAMPS: Bold Blossoms, Background Basics: Splats
INK: Simply Chartreuse, Soft Stone, Hibiscus Burst, Raspberry Fizz, Winter Wisteria, and True Black
PAPER: Stamper's Select white and Raspberry Fizz card stock; True Black Bitty Dots patterned paper
OTHER: True Black baker's twine, clear sequins


That's it for now. What a great release!
For more release wrap-ups, visit the Papertrey team:


Thursday, January 14, 2016

Inspiration Station -- Love the Life You Live


Just sharing a little peek at a project of mine that will be featured in the Reverse Confetti newsletter tomorrow. If you're not already a subscriber, you can sign up HERE.

Inspiration Station is exclusive to the newsletter, and I really want you to see the whole card, so go sign up now! Pretty please! :)


Introducing Coin Purse II


Welcome to third group post for Papertrey's January release countdown. Today, we are introducing a new stitching die set, the Coin Purse II. Erin's first Coin Purse was a big hit, and I'm sure this one will be too! 

The dies in the Coin Purse II set will work for both a button-closure coin purse and a drawstring bag. You'll be seeing a mixture of both from the team today, so you'll get a really good idea of the different options.

The January release will be available at 10 pm EST tomorrow, January 15 in the Papertrey Ink store.


This is a look at the purse with the flap open. You can see that I've embellished both the purse front and the inside with some flower-shaped felt buttons that I die-cut using the Button Stacks dies. The pink flower in the center with the real Pure Poppy button on top, is actually the button used for the purse closure. I added the felt button behind it so that it would blend in with the rest of the floral motif.


Here's a closer look at the felt Button Stacks.


On the outside of the flap, I added a felt butterfly that I cut using the new Bitty Butterfly Cover Plate. It is nicely held in place with the felt button on top.


I decided to make this purse for my daughter to keep at school in her locker and wanted to incorporate magnets somehow, so that it could hang right on the locker door and not get lost among the rest of her locker contents. I thought about trying to sandwich magnets in between the the two layers of the back side of the purse so that they would be hidden, but worried that the magnets would lose too much of their strength with that layer of felt in between them and the locker door. So I scratched that idea.

I have magnetic vent covers on hand that I sometimes use for die storage, so I tried running one of those through my Big Shot with the purse front die. Worked like a charm (I did use the precision base plate for good measure). I was able to add that magnet layer right onto the back of the purse and stitched it up with the rest of the layers.


Here's a look at the cross-section: magnet, Smokey Shadow purse back, second Smokey Shadow purse back, and Simply Chartreuse purse front. It seems like a lot of layers, but I think that sturdy magnet layer actually made the stitching easier. 


The best part was that I got an extra pocket out of the arrangement! Come to think of it, you could also add one of these in the middle as a pocket divider. I'll have to try that next time!


Here's the purse all closed up and hanging on a magnetic chalkboard.


And here are a couple of Sharpies tucked in that back pocket.


I was able to add more contents to the purse than I expected -- some change, a couple dollar bills, lip balm, a hair tie, and one of those bottle brush thingies for cleaning braces. Oh, and the two Sharpies. I thought maybe the purse would start slipping with the weight of the added items, but it didn't at all. 

I showed it to my daughter, and she loves it! We're planning to make lots of these as gifts, both with and without the magnetic back!


DIES: Coin Purse II, Button Stacks, Bitty Butterflies Cover Plate
OTHER: felt, white embroidery floss, magnetic vent covers, Pure Poppy button


For more Coin Purse II inspiration, visit the Papertrey team:


Thanks so much for visiting!