Tuesday, March 15, 2016

New Moments Inked

Papertrey Ink is adding a fantastic sports and fitness stamp set to the Moments Inked line. Active Symbols will be releasing tonight at 10 pm, along with the rest of the March release. With three kids all involved in different sports and activities, I'm already getting a lot of use out of this one!

First, a few ways I'm using these icons and stamps in my planner:


I've stamped both directly onto the planner pages (weightlifting), as well as on sticker paper (volleyball).


I love the little karate guy! My youngest just started a  karate-related activity, too!


The past couple of weeks have been super busy, so the weekly pages are crowded. I wanted to highlight the semi-finals and championship basketball games my younger son played in, so I did that with the basketball icon. The icons are a great way to make something stand out, plus they're cute and colorful, too!


Whenever a new season of sports begins, it take me a while to remember everyone's schedule. To help, I created a laminated card insert (die-cut with the medium Binder Page die) with the days of the week (stamped with Monthly Moments: Tabbed) and then a whole bunch of circle stickers for the icons. The stickers are removable, so I can reposition if anything changes during the season, and I can swap out next season. (The empty ones are placeholders for horseback riding and music. I'm going to use the little horse from Petite Places: Barnyard for the horseback riding, but that set is out on loan at the moment.)


I've got a few more things to add once schedules are set, and then I'll have a nice cheat sheet when doing the weekly planning.


Of course, many of these little icons will work for other projects as well, such as cards:


We have friends whose daughter has had two exciting basketball achievements recently -- passing 1,000 career points for her high school and signing with a college team for next year. I made her a congratulations card using the new Paper Clippings: Congratulations and then just added a few basketballs for "confetti." Blue and gray are the colors of the college she'll be attending.


Visit Nichole's blog for links to more Moments Inked: Active Symbols inspiration!

Thanks for visiting,

Papertrey March Release In Review

We're wrapping up Papertrey's March release countdown today with a Release in Review. Here'a a look at some other projects I've made with the new products.

All of the new products will be available at 10 pm tonight in the Papertrey Ink store.


What the Doodle: Feather by Betsy Veldman
Such pretty feather images! I heat embossed in white on watercolor paper, then colored in shades of aqua, teal, and navy.


Stamps: What the Doodle: Feather

Dies: What the Doodle: Feather

Ink: Aqua Mist, Tropical Teal, Enchanted Evening, VersaMark

Paper
Stamper's Select White, Soft Stone, Enchanted Evening card stock

Other
white embossing powder, white thread, ink blending tool, sequins, watercolor brush


I trimmed down the Best Birthday die-cut, a Maile Belles design, sponged it in rainbow colors, then added as simple white sentiment die-cut. 


Dies: Best Birthday

Ink: Hibiscus Burst, Orange Zest, Bright Buttercup, Green Parakeet, New Leaf, Tropical Teal

Paper: Stamper's Select White card stock

Other: clear sequins


Another card with the Best Birthday die, this time paired with Ombre Sentiments: Birthday.


Stamps: Ombre Sentiments: Birthday

Dies: Best Birthday

Ink: Hibiscus Burst, Orange Zest, Bright Buttercup, Green Parakeet, New Leaf, Tropical Teal

Paper: Stamper's Select White and Tropical Teal card stock


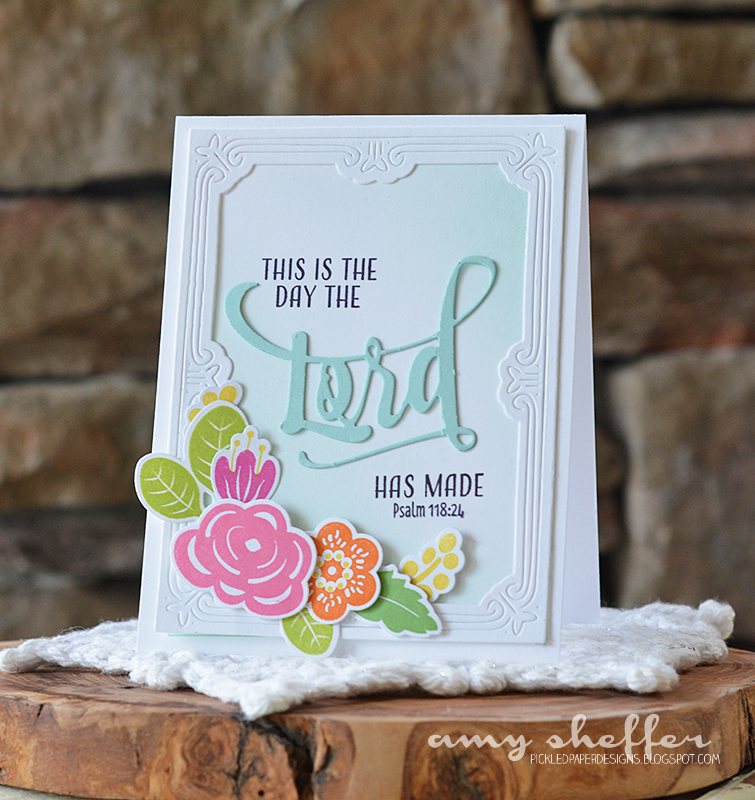
I can't bet enough of the Bloomin' Cute flower set by Betsy Veldman! Here I've paired the flowers with Inspired: Lord, also designed by Betsy.


Stamps: Inspired: Lord, Bloomin' Cute

Dies: Inspired: Lord, Bloomin' Cute, Pretty Frame

Ink: Aqua Mist, Hibiscus Burst, Orange Zest, Bright Buttercup, Green Parakeet, New Leaf, Raspberry Fizz, True Black

Paper: Stamper's Select White and Aqua Mist card stock

Other: foam adhesive, ink blending tool


The pretty sentiment was done with Fancy Pants Sentiments, designed by Erin Lincoln.


Stamps: Fancy Pants Sentiments, Bitty Butterflies

Dies: Fancy Pants Sentiments, Bitty Butterflies Cover Plate, Tag Sale #10, Songbirds

Ink: Tropical Teal, Berry Sorbet, Bright Buttercup

Paper: Stamper's Select White, Green Parakeet, Smokey Shadow and Kraft; Sheer Basics Velum; Bright Buttercup + White Basics

Other: Sheer Basics Vellum, Berry Sorbet felt, white linen thread, foam tape


I used Script Swirls: Birthday, designed by Nichole Heady, inside the circle frames. I love how those sentiment swirls work as a focal point or as a background element.


Stamps: Script Swirls: Birthday

Dies: Shaker Shapes: Circle, Paper Clippings: Congratulations, Star Scribbles, By the Numbers

Ink: Berry Sorbet, Canyon Clay, Harvest Gold, New Leaf, Limeade Ice

Paper: Stamper's Select White, Summer Sunrise, Berry Sorbet, Limeade Ice, New Leaf, Canyon Clay


Splits: Celebrate is the second in a series by Maile Belles. These ribbons are gorgeous!


Stamps: Splits: Celebrate

Dies: Shaker Shapes: Circle

Ink: Aqua Mist, Green Parakeet, Bright Buttercup; pigment black

Paper: Stamper's Select White and Tropical Teal card stock; Bright Buttercup + White Basics Paper Collection

Other: clear embossing powder, yellow Copic, foam tape adhesive


For more March release inspiration, visit the Papertrey team:


Monday, March 14, 2016

Introducing Stitched Trays & More


Papertrey's March release countdown continues today with all kinds of new stitching dies, designed by Erin Lincoln. I'm super excited about these Stitched Trays! Who doesn't love (and need) cute and functional organizing tools? 

Remember, today's featured products, along with the whole March release, will be available at 10 pm March 15 in the Papertrey Ink store.


The tray itself will be available in a square shape or a rectangle shape. In addition, there is optional trim for both tray designs. Last, there are a number of additional stitched embellishments, including a folk flower, monogram frames, sequins, and this adorable bicycle. (And of course those embellishments will work on many other stitched projects!)


I chose to work with the Stitched Tray: Rectangle, Stitched Tray: Rectangle Trim, and the adorable Stitched Bicycle. My tray is die-cut from Papertrey's Lemon Tart felt, the trim is Simply Chartreuse, and the bicycle is Aqua Mist, Berry Sorbet, Smokey Shadow, Simply Chartreuse, and Winter White. For the most part, I stitched with floss to match the felt colors, with the exception of the trim, where I used white floss for contrast.


There are different options for the corners, but I'll tell you what I did. I stitched the whole tray while flat. The tray is in two layers, by the way, to hide the backside of the embellishment stitching. This way, the bottom of the tray looks just as nice and finished as the rest:


 For added stability, I placed a card stock insert between the layers on the bottom as well as all four sides. Easiest way to do this was to die-cut a Stitched Tray: Rectangle out of card stock and then trim off the stitching holes. What's left fits perfectly between the layers.

After I had the tray stitched, I folded up the sides, bringing the corners together. The are held together by the trim pieces. There are four trim pieces in all. The trim for the long sides is longer than the long side of the tray, so those trim pieces wrap around the corner, and serve to hold the corners together. The trim for the short sides is the exact length of short side of the tray. When assembled, the short trim pieces overlaps the extra length from the long sides for a nice, finished look.

 If you don't use the trim piece, Erin has designed a really cute button closure for the corners. I think you could also stitch the corners together using something like a baseball stitch, or even pinching them together and doing a running stitch. (I haven't tried those out yet, though!)

Be sure to visit Erin's blog for all the stitching how-to!!


The sweet Stitched Bicycle is irresistible! There are a lot of different pieces, but Erin's stitching instructions make it easy to stitch up. I added a Bitty Button Stack flower to the bike's basket.


These trays are perfect for jewelry, keys, odds and ends that tend to gather, candy, or any number of things. Great for yourself, great for gifts!  


For more Stitched Tray inspiration, pleas visit the design team:

Sunday, March 13, 2016

Super Heroes & Stars

 Welcome to Day Four of Papertrey Ink's March release countdown. Today is also our second group post for this release, so there's lots and lots of inspiration today (design team links at the bottom of the post).

Today's featured products are:
Paper Clippings: Congratulations and Dress Up Dolls: Superhero.

All of the new products will be available at 10 pm March 15 in the Papertrey Ink store.


Paper Clippings: Congratulations is so gorgeous! I just love the movement and energy of all those swirls and stars. I die-cut the clipping from white card stock, then used Paper Clippings: Congratulations stamps to add color to the stars and the little pieces of confetti.


I created an easy watercolor background in bright greens and yellow by first sponging the panel with Green Parakeet ink, then adding water and moving the color around with a brush, and last dropping in some additional colors for more depth and interest. In this case, Bright Buttercup, New Leaf and a tiny bit of Tropical Teal. After everything was dry,  I added some New Leaf and Tropical Teal splatter. 

I find that sponging the main color on before adding water is a quick way to get good coverage and saturation, but picking up ink from a palette and painting more traditionally should get you the same look. 

Even with the dry time for the watercoloring, this was a fairly quick card to make. The Paper Clippings die-cuts are so big and dramatic, it doesn't take much to make them sing! And I always love how a stark white die-cut pops against a bright background, too!


StampsPaper Clippings: Congratulations

DiesPaper Clippings: Congratulations, Frosted BordersSmall Sketched Stars

Ink: Summer Sunrise, Raspberry Fizz, Green Parakeet, Hibiscus Burst, Tropical Teal, New Leaf and Bright Buttercup

Paper: Stamper's Select White, Tropical Teal and Raspberry Fizz card stock; watercolor paper; Stormy Sea + White Basics paper collection

Other: foam adhesive, watercolor brush


{squeal} How cute is this superhero outfit that Betsy has designed for her Dress Up Dolls collection?! Insanely clever wardrobe design, too. I colored my little superhero to be wearing a leotard with her cape, gloves and boots (she lives in a warm climate {wink}), but you could give her a long-sleeve shirt and tights instead (or either/or) just by changing your marker colors. That little piece at the top of the bodice is a separate stamp, too. Leave it off for a boy costume. Maximum versatility -- love that!


On the card panel, I stamped some of the swirls and stars from Paper Clippings: Congratulations for a little extra pop of color. The green circle background is cut from Green Parakeet, then stamped with rays from Blue Skies and both white and New Leaf stars from Paper Clippings: Congratulations.


StampsDress Up Dolls: Basics, Dress Up Dolls: Superhero, Paper Clippings: Congratulations, Blue Skies

Dies: Dress Up Dolls: Basics; Dress Up Dolls: Superhero, Small Sketched StarsFrosted Borders, Shaker Shapes: CircleZappy Birthday, Paper Clippings: Congratulations, Monthly Moments: Journal Card 5

Ink: Green Parakeet, Hibiscus Burst, Summer Sunrise, Stormy Sea, Tropical Teal, White

Paper: Stamper's Select White, Tropical Teal, Green Parakeet, Raspberry Fizz, Summer Sunrise, and Smokey Shadow card stock; Vellum card stock

Other: foam adhesive, Copic markers


For more Super Heroes & Stars inspiration, visit the Papertrey team:


Thanks for stopping by!


Saturday, March 12, 2016

Sweet Inspirations

Welcome to Papertrey Ink's March release countdown, Day 3. 
Today is all about birthdays, cakes, sprinkles, and frosting -- YUM!

On the {dessert} menu today:

Sprinkles On Top stamps and dies + Frosted Border dies
innovative stamps and dies for cake decorating right on your card front

Big Birthday Candles dies
top your sprinkled and frosted confections with paper versions of the iconic, oversize number candles

Just Desserts + Just Desserts Sentiments
elegant layered cakes, sprinkles, and toppings, along with super sweet sentiments


All of the new products will be available at 10 pm March 15 in the Papertrey Ink store.


First up is a 50th birthday card that incorporates Sprinkles On Top, Big Birthday Candles, and the Frosted Border dies. I made a simple cake base out of a rectangle with rounded corners on one side. The rows of star sprinkles are stamped die-cuts. The Sprinkles On Top stamp set has a solid star image, which makes short work of "coloring" all the sprinkles.


I love these Big Birthday Candles dies -- too fun! The colorful circles on the inside piece of the candles were stamped with Confetti Toss


Since this card is for the big 5-0, I thought it would be fun (and funny) to include one of the "you've got this" sentiments from the new Keep It Simple: Encouragement stamp set.


StampsSprinkles On Top, Star Scribbles, Confetti TossKeep It Simple: Encouragement, Keep It Simple: Birthday II

Dies: Sprinkles On Top, Star Scribbles, Frosted Borders, Big Birthday Candles

Ink: Lemon Tart, Summer Sunrise, Raspberry Fizz, Green Parakeet, Hawaiian Shores, Smokey Shadow

Paper: Fresh Snow linen card stock: Stamper's Select White, Hawaiian Shores, Green Parakeet, and Raspberry Fizz card stock

Other: Raspberry Fizz baker's twine, silver star sequins


I've dabbled in cake decorating a couple of different times over the years, and LOVE watching Cake Boss, so I couldn't wait to use the Frosted Borders dies. So much fun -- no mess and so easy to whip of batches of frosting in all your favorite colors! 

For this tiered wedding cake, I once again built the cake bases out of simple rectangles with the rounded top corners, then added the Frosted Borders and some floral accents. I'm totally picturing fondant covered cakes, buttercream piping, and sugar flowers! 


The florals were done with Bloomin' Cute stamps and dies, along with die-cut leaves from Songbirds. The sentiment is from Scripted.


The cake topper is a pair of hearts that I die-cut with XOXO dies.


Stamps: Bloomin' Cute, Scripted

Dies: Frosted Borders, Songbirds, XOXO

Ink: Hibiscus Burst, Raspberry Fizz, Bright Buttercup, Summer Sunrise, Orange Zest, New Leaf, Aqua Mist

Paper: Stamper's Select White, Hibiscus Burst, and Green Parakeet card stock

Other: ink blending tool, corner rounder


Just Desserts .... sigh .... I love this set so much! I've been so bad about keeping in touch with my BFF and college roommate, but at least twice a year, we try to have a good catching up chat -- on her birthday and on mine. Although her birthday was a couple of weeks ago, she is the inspiration for this card. I still remember that her favorite cake in college was a yellow cake with chocolate frosting. Her mom would ship her a homemade cake for her birthday every year. I don't know the recipe, but my roomie called it a Molly Cake (Molly is her mom's nickname). It was so incredibly moist that it made the journey from Colorado to Virginia without seeming to dry out in the least. Those homemade cakes never lasted long in the dorm!


Anyway, I stamped my Molly Cake in Lemon Tart, then added the crumb texture using just one of the sprinkles images. I topped the cake with some pretty pink flowers and candles, then adhered the whole panel to one of the papers in the Confetti Toss collection. The little strips of confetti were just enough to frame my sweet cake while letting its simple elegance speak for itself.


Stamps: Just Desserts

Dies: Just Desserts

Ink: Lemon Tart, Fine Linen, Dark Chocolate, Hibiscus Burst, Raspberry Fizz, Green Parakeet, True Black

Paper: Fresh Snow Linen card stock; Confetti Toss patterned paper collection

Other: Raspberry Fizz baker's twine, Copic Markers


For more sweet inspiration, visit the Papertrey team:


Thanks for stopping by!