Friday, December 15, 2017

Curtain Call Challenge - Pines

I'm so honored to re-join the Curtain Call Crew for their FINAL Curtain Call challenge. This challenge blog has long been one of my very favorites, so it's especially sad to see it end. A huge thank you so Stacey Schafer for creating this challenge and for all the designers and behind-the scenes organizers for providing so much inspiration month after month!

Please join us for this farewell challenge. All the details are posted HERE on the Curtain Call blog. The deadline to link up is December 25, 8 am CDT.

Here's the inspiration photo:


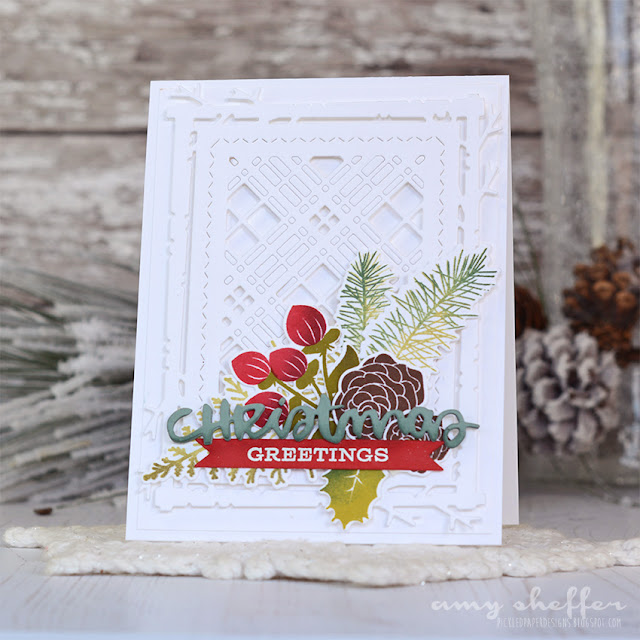
And here's my take on it:


I was inspired by the pine sprigs, berries, and all the white space. My stamped greens and berries are all from one of my favorite Papertrey Ink sets ever, Holiday Greens


I went with an all-white background, but could resist adding some subtle plaid with an all-white Mix & Mat: Plaid die-cut, also by Papertrey. The sentiment is a mixture of a Jingle All The Way "Christmas" die-cut, plus a stamped "greetings" from the Christmas Cheer stamp set.

There's lots more inspiration on the Curtain Call Challenge Blog from the Curtain Call Crew, guests, and alumni. 

So glad you stopped by!


Tuesday, December 12, 2017

Papertrey Ink December 2017 Release - Quoted: Honeycomb


Welcome to Day 3 of Papertrey Ink's December release countdown. Today's featured products are: Quoted: Honeycomb, Stencil Basics: Hexagon, Year of Psalms: December, and the Round Off Edgers die set.

All of the new products will be available at 10 pm ET December 15 in the Papertrey Ink store.


I have a few projects so share that all feature the Quoted: Honeycomb stamp set.


I had so much fun playing with honeycomb backgrounds on today's cards. There is one hexagon image in the set, and it's amazing what you can do with just that one little image! For this first card, I stamped in Versamark, heat embossed, and splattered with white paint.


Along the bottom, I used two of the Round Off Edgers dies to create the soft curve and matching petite scallop border. Finishing off that bottom edge is a small strip of Soft Stone Bitty Big patterned paper.


For the sentiment, I die-cut a tag using the Tag Sale #2 die, then stamped the stripes and sentiment.


The sentiment tag is pinned to a second tag with a tiny little clothespin embellishment. From this angle, you can also see the shine from the heat embossed background.


Stamps: Quoted: Honeycomb


Soft Stone Bitty Big patterned paper

Dies: Tag Sale #2, Round Off Edgers

Other: clear embossing powder, True Black baker’s twine
clothespin, white craft paint


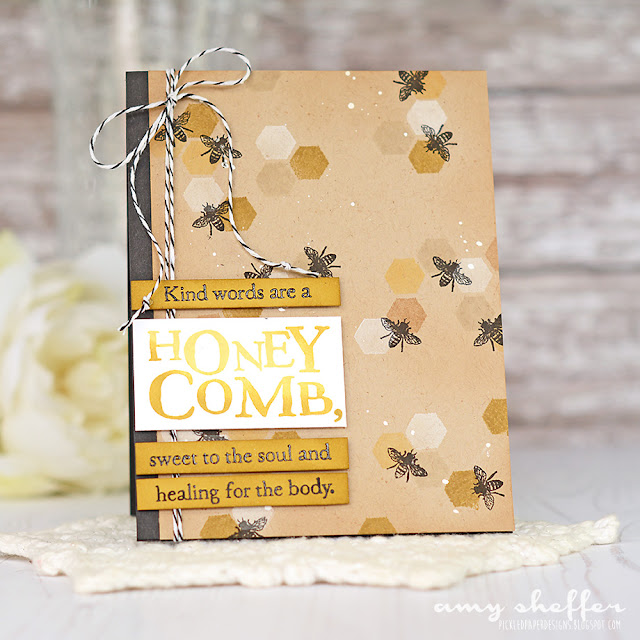
For my next card, I stamped a honeycomb background in different shades of yellows, golds, and browns, then lightly watercolored over it with re-inkers to mimic the look of dripping honey.


I stamped part of the sentiment onto the honeycomb as well as some bees buzzing around. The big "honeycomb" is stamped on a separate strip and popped up.


Stamps: Quoted: Honeycomb


And then one last card for today. This time stamped smaller honeycomb pieces onto a Classic Kraft background. I mixed up the colors again for variety.


Each part of the sentiment has been stamped and popped up. The smaller strips are Saffron Spice card stock. The word "honeycomb" is stamped with a stamp positioner so that I could easily get the blend of Harvest Gold and Saffron Spice inks.


Stamps: Quoted: Honeycomb


OtherTrue Black baker’s twine, white craft paint


Be sure to visit the new Papertrey Ink blog, where you'll get lots of inspiration for Quoted: Honeycomb as well as all of today's other featured products. I'm so excited about the products in this release!

Thanks so much for visiting!


Friday, December 8, 2017

Papertrey Ink Traveler's Journal: Covers


It's Traveler's Journal day over on the Papertrey Ink blog! In this month's feature, we are looking at different materials you can use for your covers.


The Traveler's Journal: Outer Cover die set is perfectly sized to hold three of the Traveler's Journal: Page Blanks booklets, and the die will cut through many different materials. Previously, I've made outer covers from Papertrey's felt and from canvas. Today I'm sharing how I put together a cover with a fabric exterior and felt interior.


Here's a little how-to:


First, I die-cut some fun foam using the Traveler's Journal: Outer Cover die.


Next I picked out a pretty plaid fabric ...


... and cut a rectangle a bit larger than the fun foam diecut.


I wrapped the fabric around the fun foam and adhered (temporarily) with my ATG gun.


Then I machine stitched the perimeter. 


Next, I die-cut a felt outer cover, again using the Traveler's Journal: Outer Cover. and glued that to the inside using fabric glue. (You could also machine-stitch all three together at once.)


Using the holes in the red felt diecut as a guide, I punched holes all the way through the plaid fabric. Next, I used large eyelets to reinforce those holes.


I used an eyelet setter and hammer from my stash. Remember those?


The eyelets give the notebook such a nice, finished look don't you think?


Here you can see the spine with all the elastics in place. One piece of elastic holds the notebooks and the other piece works as the notebook closure.


I added a felt snowflake embellishment to the closure elastic. The red and white baker's twine goes down through the button and snowflake, around the elastic, and back up through the snowflake and button, tying off in a bow. This holds the snowflake onto the elastic, but allows it to slide, too. (I hope that makes sense!)

The snowflake was cut using the Snowfall Style I die. I cut one from Vintage Cream felt and one from white card stock, then glued them together to give the felt more stability.


Aside from the plaid being a little crooked on the back (be careful when using plaids and/or stripes!), I'm loving this fabric cover and can't wait to make more in different patterns and colors!

For more Traveler's Journal inspiration, be sure to visit the Papertrey Ink blog. 

Thanks for visiting!


Reverse Confetti December Hop


Hello friends! It's the 8th of the month, and the Reverse Confetti Crew and Friends are blog hopping. I am guest posting on the Reverse Confetti blog and kicking off the hop, so head on over there to join me!

And then for lots more inspiration, here's the hop order:


Monday, December 4, 2017

Advent Calendar Extravaganza with Taheerah Atchia

Hi there and happy December! I'm so excited to be part of Taheerah Atchia's Advent Calendar Extravaganza again this year. This event is such a holiday highlight in the cardmaking community!


Advent Calendar Extravaganza is -the- festive event of the season! This 'hop with a twist' was dreamed up by Taheerah Atchia and features surprise destinations each day! Joining in the fun with Taheerah are ONE HUNDRED special guests - each serving up some fantastic Christmas inspiration! Just like an Advent Calendar, you'll never know where you're going to be visiting next until you 'open the door'!

And that's not all! With 25 *amazing* sponsors taking part as guests as well, your crafty wish list is bound to get a boost with a chance to win a prize EVERY SINGLE DAY!!

Join in the fun every day at taheerah-atchia.com to see what special surprises await behind the door!


My project features my current favorite Reverse Confetti stamp set: Cool Friend. I adore those snowmen!


I created a pretty little scalloped and stitched window for my snowmen pair using one of the dies in the Scalloped Squares Confetti Cuts set. The patterned papers are both from Reverse Confetti's colorful Cheerful & Kind 6x6 Paper Pad.  For accents, I added some silver metallic twine and some Snowflake Trio die-cuts topped with jumbo sequins. In the background, for a touch of added interest, I adhered a white Rounded Stripe Panel Confetti Cuts to the top third of the card.


The sentiment is from Reverse Confetti's Sentimental Christmas. Isn't that font fabulous?!


Confetti Cuts DiesCool FriendScalloped Squares

Ink: Memento Tuxedo Black, Versafine Onyx Black


Other: silver embroidery floss, Jillibean Soup sequins


It's not a party without a prize - and with prizes every day there are several chances to win! Today's prize is generously supplied by Reverse Confetti so you'll definitely want to win! Simply leave a comment on this post - then head back to taheerah-atchia.com and leave a comment there too! You must leave a comment on Taheerah's blog as well as mine in order to be eligible to win! Don't forget to grab the other surprise destinations from Taheerah's blog and head over to them to leave comments there as well as to improve your odds even more! You have until 23:59 EST on 31st December 2017 to enter.

Don't forget Advent Calendar Extravaganza runs from 1st-25th December inclusive so make sure you visit taheerah-atchia.com every day for fabulous inspiration and amazing prizes every single time!


Thanks for visiting, and Merry Christmas!


Sunday, November 26, 2017

You're A Cool Friend - November SFYTT


I'm popping in today to share some Reverse Confetti Sketch For You To Try inspiration. The November sketch challenge is winding down, so be sure to get your entry linked up! All the sketch details are posted HERE on the Reverse Confetti blog.

Here's the November sketch:


I picked out the recently released Cool Friend stamp set for my card. Aren't these snowmen just the absolute cutest?! I'm also loving these two patterned papers together. Both are from the Cheerful & Kind 6x6 Pad.


I accented with a trio of Snowflake Trio snowflakes, each coated with some Clear Wink of Stella shimmer and topped with a black sequin.


Stamps: Cool Friend
Confetti Cuts Dies: Cool Friend, Lacy Scallop Circles, Snowflake Trio
Ink: black
Paper: Premier Polar White, Stone, and RC Aqua card stock; Cheerful & Kind 6x6 Pad
Other: Clear Wink of Stella, black sequins, Copic markers, white gel pen


Thanks so much for visiting!