Saturday, December 24, 2016

Advent Calendar Extravaganza with Taheerah Atchia


Advent Calendar Extravaganza is -the- festive event of the season! This ‘hop with a twist’ was dreamed up by Taheerah Atchia and features surprise destinations each day! Joining in the fun with Taheerah are ONE HUNDRED special guests - each serving up some fantastic Christmas inspiration! Just like an Advent Calendar, you’ll never know where you’re going to be visiting next until you ‘open the door’!

And that’s not all! With 25 *amazing* sponsors taking part as guests as well, your crafty wish list is bound to get a boost with a chance to win a prize EVERY SINGLE DAY!!

Join in the fun every day at taheerah-atchia.com to see what special surprises await behind the door!


Before I get to my project, just wanted to give a big shout-out and thank you to Taheerah for organizing this event. I'm so honored to participate this year!


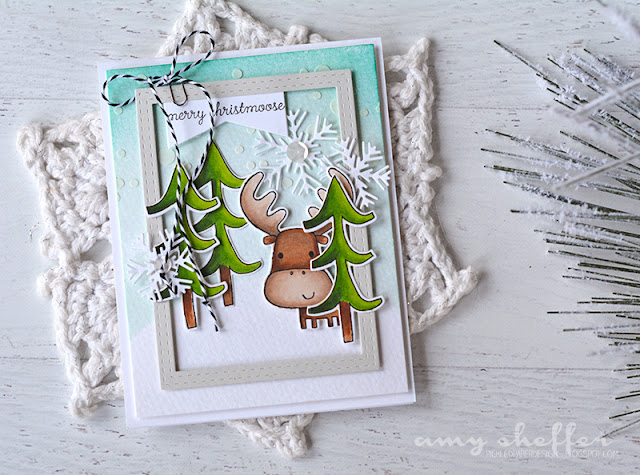
My card features the adorable Merry Christmoose stamp set from Reverse Confetti. I just adore this little guy and those super cute, whimsical trees.


I started by blending a gradient background in shades of aqua and turquoise. Next I used some embossing paste and a stencil to add some texture to the background. Next comes a stitched frame that I die-cut with the All Framed Up Confetti Cuts die, some sequin-topped Snowflake Trio Confetti Cuts die-cuts, a simple sentiment flag, and a twine-adorned clip.


And last comes the main event: the stamped and Copic-colored moose and trees. I think the moose looks especially sweet peeking out from behind the tree. I wonder what wonder he beholds?


Stamps: Reverse Confetti Merry Christmoose
Dies: Reverse Confetti Merry Christmoose, All Framed Up, Snowflake Trio Confetti Cuts
Ink: Memento Tuxedo Black, Reverse Confetti Iced Aqua and RC Aqua
Paper: Neenah Solar White, watercolor paper, Reverse Confetti Stone card stock
Other: ink blending tool, embossing paste, stencil, white satin sequins, Copic markers, mini paper clip, black and white baker's twine


It’s not a party without a prize - and with prizes every day there are several chances to win! Today’s prize is generously supplied by Clearly Besotted, so you’ll definitely want to win! (Just FYI, the Clearly Besotted store is temporarily closed, but will re-open in the early part of the new year.) 

Simply leave a comment on this post, then head back to taheerah-atchia.com and leave a comment there too! You must leave a comment on Taheerah’s blog as well as mine in order to be eligible to win! Don’t forget to grab the other surprise destinations from Taheerah’s blog and head over to them to leave comments there as well to improve your odds even more! You have until 23:59 EST on 31st December 2016 to enter.

Don’t forget, the Advent Calendar Extravaganza runs from 1st-25th December inclusive so make sure you visit taheerah-atchia.com every day for fabulous inspiration and amazing prizes every single time! 

Thanks for visiting, and Merry Christmas!

Friday, December 23, 2016

Jingle All The Way


Hello, and Merry Christmas Eve Eve! Before Santa comes and goes, I wanted to share this sweet Jillibean Soup card I created a while back. I mentioned Jillibean Soup's Shape Shakers collection a couple of days ago. As wonderful as the Shaker Stamps are in conjunction with the shakers, many of the stamp sets in the Shape Shakers line can be used on their own, too. Here, I've done a little scene mash-up using the santa and reindeer image from Snow Globe along with a row of houses and sentiment from Peace, Joy & Love.

The non-traditional color combo was inspired by some of the patterns and colors in the Hardy Hodgepodge collection. 


Jillibean Soup Supplies:

Patterned Paper:  Hardy Hodgepodge/Pounds of Pups, Trace of Triangles, Bits of Letters; Chit Chat Chowder/Crisp Crackle
Shaker Card:  Large Circle
Shaker:  Large Circle
Shaker Stamps:  Snow Globe Stamp Set
Sequin Fillers:  Red/Pink, Greens, Blues
Tags:  Chalkboard/Jewelry
Alphas:  Mini Alpha

Other Supplies: kraft and dark gray card stock; Versamark, Aquamarine, Lime Green, Berry, and Kraft ink; turquoise twine; foam adhesive; 3 mm white satin sequins; wood veneer stars; stitched border rectangle die


Thanks for stopping by!


Thursday, December 22, 2016

No Peeking


I love the look of dropped out text. 
Reverse Confetti has released few dies lately that feature this look: 
No Peeking Tag Layer Confetti Cuts and Holly Jolly Tag Layer Confetti Cuts, for example. And then there's the Jingle All The Way die that you can cut out of whatever shape you'd like.

For today's tag, I cut out the two sentiment strips from the No Peeking Tag Layer Confetti Cuts and used them as sentiment flags instead. 

The tag is basically five components: 

Dark gray tag base, which is from Topped Off Tag
Stone 2 Way Stripes Tag Layer Confetti Cuts
Avocado Leafy Wreath Confetti Cuts with Brick berries 
(the berries, which are larger than those included in the Leafy Wreath die set, 
were borrowed from the Holly Confetti Cuts die set)
Cloud White "no peeking" sentiment from No Peeking Tag Layer Confetti Cuts
Dark gray tag hanger, done with the Hang Ups, Too Confetti Cuts


Hope you're having a great week!


Wednesday, December 21, 2016

Season's Greetings Snow Globe Shaker


Popping in to share a holiday shaker card I created for Jillibean Soup using their Shape Shakers products. The Shape Shakers line includes shaped clear domes, pre-cut card bases to match the shaker shapes, coordinating stamps, and then of course some sparkly shaker filler! If you haven't seen these shaker components yet, check out this video tutorial to see how easy shaker cards can be!

I'm using the large shaker circle and Snow Globe stamp set combo today. I can't wait to play with some of the other shapes, too -- stars, mason jars, clouds, small circles, and squares!

I cut down one of the pre-cut shaker shape cards to use as a layer, backed it with some dark gray card stock where I stamped the scene, and filled it with some colorful Shaker Sequin Fillers. The patterned paper strips behind the shaker layer are from the Hardy Hodgepodge and Chit Chat Chowder collections.

Look for the Shape Shakers and all Jillibean Soup products at your favorite scrapbook/stamp retailer.

Jillibean Soup Supplies:
Patterned Paper:  Hardy Hodgepodge/Pound of Pups, Trace of Triangles

Clear Stamps:  Peace, Joy & Love

Other Supplies: cardstock (white, berry, stone, black), Versamark, white, black, and aquamarine ink, black and white baker's twine, aqua wired cord, jingle bells, corner rounder, white embossing powder


Thanks for visiting!


Friday, December 16, 2016

Big Merry Christmas Hugs

Today is my last post as Neat & Tangled's December guest designer. I've had a blast playing with their products, and am so grateful for the opportunity!

I made two projects for today (completely unrelated). For detail photos and more about the cards, please visit me on the Neat & Tangled blog.


The first one features Purrfect stamps/dies and the Big Hugs die.


And this one features the Star Cover Plate and Merry & Bright dies. I've also used the Please Deliver stamp set to dress up the coordinating envelope.

Have a great weekend, friends! Stay warm!


Thursday, December 15, 2016

Papertrey December Release in Review

It's Release Day at Papertrey Ink! One more look at some of the new products coming to the store tonight at 10 pm!


I adore the fitness-themed products we have this month! I used one of the Traveler's Journal Page Blanks booklets to make a fitness notebook. I'm not sure yet if I'll use it as an exercise log or as more of a fitness/wellness journal, but either way, I love it! I decorated the cover with Nichole's She Moves stamps and dies, as well as Lizzie's Making Strides stamps.


On the first page, I added a simple motivational message from Stroke Speak, as well as a trio of fitness die-cuts in some of my favorite colors: Green Parakeet, Tropical Teal, and Dark Indigo.


The next two pages are where the journaling or fitness log will start. At the top of the left page, I stamped a Making Strides sentiment onto a Fabulous Frames die cut, and along the bottom I stamped fitness icons with Moments Inked: Active Symbols images.


Stamps: She Moves, Making Strides, Moments Inked: Active Symbols

Dies: She Moves, Fabulous Frames, Sketched Stars

Ink: Green Parakeet, Tropical Teal, Enchanted Evening, Dark Indigo

Paper: Traveler's Journal Page Blanks; Green Parakeet, Tropical Teal, Dark Indigo card stock

Other: jute string, silver sequins, mini clip


Next is a notecard featuring the new Lilac Grace card stock and a gorgeous floral image from Nichole's Fresh Bouquet.


I watercolored the flowers using a combination of Papertrey inks and Zig Clean Color brush markers.


I love the sentiments in Fresh Bouquet. Beautiful messages of hope and encouragement, and the script font is gorgeous.


Stamps: Fresh Bouquet

Dies: Fresh Bouquet, Noted: Scalloped Square

Ink: Versafine Onyx Black; Papertrey New Leaf, Lilac Grace, Aqua Mist, Blueberry Sky, Ripe Avocado, Amethyst Allure

Paper: Stamper's Select White and Lilac Grace card stock; watercolor paper

Other: True Black baker's twine, clear embossing powder, Zig Clean Color markers, white satin sequins


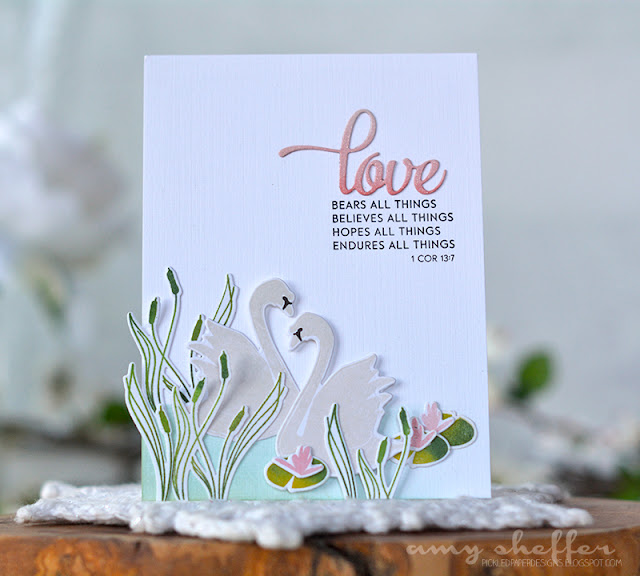
I've saved my personal favorite for last. I stamped these swans and their scene with Maile's Swan'sational. The sentiment was done with the Inspired: Love stamps and dies.


I lightly sponged the bottom corner with Aqua Mist, then arranged the cattails and lily pads before tucking in the elegant swans.


I brushed the word die-cut with a clear Wink of Stella for a subtle shimmer (hard to see in the photos).


Stamps: Swan'sational, Inspired: Love

Dies: Swan'sational, Inspired: Love

Ink: Pale Peony, True Black, Fresh Snow, Soft Stone, New Leaf, Prairie Grass, Pinefeather, Aqua Mist, Simply Chartreuse

Paper: Stamper's Select White, Fresh Snow Linen, and Pale Peony card stock

Other: foam adhesive, clear Wink of Stella


Thanks for visiting!


Wednesday, December 14, 2016

Mom & Me Valentine Inspiration


Welcome to Day 5 of Papertrey Ink's December release countdown! Today we have some darling products to help out with your Valentine crafting. Today's projects are kid-friendly -- perfect for Mom & Me Valentine crafting!

All of the new products will be available at 10 pm ET on December 15 in the Papertrey Ink store.


My first project features Jumping For Joy, designed by Nichole Heady. I absolutely love these! They are modeled on the old wooden, jointed doll toys where you pull the string and the arms and legs move. Super quick and easy to cut, stamp and assemble, too. If you're a mom crafting with kids for Valentine's Day, this would be a great project to work on together. Even very young kids could put the arms and legs on with the brads and stamp the different parts of the face.


Attaching the string is pretty easy, too. The dies cut not only the holes for the brads, but tinier ones for the pull string. (Nichole will have a video showing the assembly.) At the bottom, I attached a tiny tag that says "pull."


Once the doll is assembled, you can slip it through the slit on the Jumping For Joy Card for presentation.

What I've always found with my kids is that they like to see one card through to finish, rather than assembly-line stamping and assembly. It takes a little longer their way, but it keeps them interested. A couple of other tips for success are to keep the project simple and, when making multiples, spread it out over a few days. I can remember the preschool days, where just writing their name took them multiple days!


Stamps: Jumping for Joy

Dies: Jumping For Joy

Ink: Sweet Blush, Fresh Snow, Smokey Shadow, Pale Peony

Paper: Stamper's Select White, Pale Peony, Sweet Blush, Soft Stone, and Smokey Shadow card stock

Other: brads, True Black baker's twine


Most kids love being silly and being center stage. My kids have especially loved the Valentines where their picture is somehow incorporated (holding a lollipop, holding a glow stick as a light saber, etc.), so I thought it would be fun to give Betsy's Dress Up Doll a new head -- my son Gabe's!


I found the easiest way to do this was to print Gabe's head, stamp the body (Dress Up Dolls: Basics), die-cut the panel down to size, and then add all the Dress Up Dolls: Puppy Love extras (clothing, puppy, leash, etc.). 


My kids are a little older now, so with some supervision, I think they could pull off almost all of the assembly on these. Younger kids would still have fun coloring the clothes, puppy, and leash.


Stamps: Dress Up Dolls: Basics; Dress Up Dolls: Puppy Love

Dies: 
Dress Up Dolls: Basics; Dress Up Dolls: Puppy Love, Double Ups: Rectangles, Valentine Pin-Ups (heart tag)

Ink: Memento Tuxedo Black, Versamark

Paper: Stamper's Select White and Pure Poppy card stock

Other: True Black baker's twine, enamel dot, ink blending tool and foam, Copic markers


Thanks for visiting!


Tuesday, December 13, 2016

Feel Better Inspiration


Welcome to Day 4 of Papertrey Ink's December release countdown, and our second of three big group posts for this release. Today we are featuring some really cute and clever products that will help you make unique get well cards and care packages. Take It Easy stamps and dies, the Cozy Bed dies, and the Tissue Cover dies are all designed by Erin Lincoln. 

All of the new products will be available at 10 pm ET on December 15 in the Papertrey Ink store.


I've created a card and small care package that is sure to lift the spirits of anyone under the weather. 


The care package items are all packaged in a white berry basket from Michael's.


A couple of glamour shots of the contents ;)


Everything looked so bright and cheery I couldn't resist taking a few extra pictures!


 I clipped a tag (label really) to the basket with a small white clothespin. Keep It Simple: Sending Hugs is stamped onto a Tag Sale: Quilted banner die, then adhered to an oval that was cut from the Summer Sunrise Distress Dots pattern using the oval die from the Tissue Cover (more on that in a minute).


Here's everything all laid out. The soup mix goes in the brown sack. Everything else is loose. You can get a good look at the adorable Tissue Cover here, too. Use one die to cut both the top and bottom, then quickly fold and adhere for the perfect size box for the small purse-size tissue packs. The separate oval die in the set cuts the opening out of the top.


I decorated my Tissue Cover with two strips of Summer Sunrise card stock, as well as a Green Parakeet Simple Gift Bow die-cut.


As I mentioned above, the brown paper sack holds the soup mix. I decorated the bag top with Big Hugs and Fancy Foliage Details die-cuts. The wooden spoon is embellished with some of Papertrey's new skinny washi tape and some True Black baker's twine.


And last is a card using Erin's super clever Cozy Bed dies. Seriously, how cute is this?!


On the bed are Copic-colored PJs, a newspaper, and a pair of reading glasses. These images are all from Take It Easy. My favorite part of the set is that there are different headlines you can stamp on the newspaper. This one says, "Mom Takes Day Off: NASA Reports World Didn't Stop Spinning." So cute!


Above the headboard, I layered some rectangles for a picture-frame look and stamped one of the sentiments inside. 


Stamps: Keep It Simple: Sending Hugs; Take It Easy

Dies: Take It Easy, Tissue Cover, Cozy Bed, Big Hugs, Songbirds, Fancy Foliage Details

Ink: True Black

Paper: Stamper's Select White, Classic Kraft, Green Parakeet, Hibiscus Burst, and Raspberry Fizz card stock; Distressed Dots 8x8 Patterned Paper collection; woodgrain patterned paper (source unknown)

Other: Copic markers, enamel dot


Thanks for visiting!

SaveSave