Thursday, March 31, 2011
My Time Made Easy: So Berry Sweet
I have some super fun news, a project, and a very long post to share today. I've been invited to guest design for My Time Made Easy and of course wasted no time saying yes! I've always been beyond amazed at Lauren's inventiveness, and her design team is so incredibly talented. It is an honor to join them for the April release!
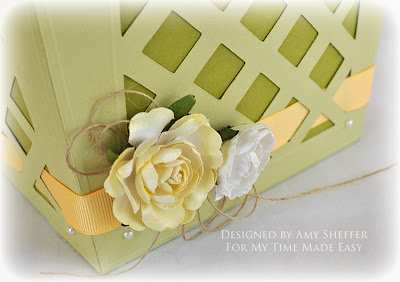
The next six days will be packed with inspiration as the MTME designers showcase some new templates and stamp sets, which will be officially available in the MTME store tomorrow, April 1. Today, we're featuring the new Pretty Packaging template called Berry Sweet Basket, an adorable basket that looks just like the fruit containers you see at the grocery store. I chose to use it as an Easter gift basket to hold a simple potted plant, and I have to say, I'm in awe over how much this basket does to dress up an otherwise ordinary item!
I started by cutting the basket pieces out of some nice Spring green card stock using my Cricut along with the Sure Cuts A Lot software. (If, like me, you're new or relatively new to cut files, check out Lauren's Easy Guide to Using Cricut with SCAL Software tutorial [scroll down toward the end], where she walks you through everything you need to know.)
Before I assembled my basket pieces, I added a little bit of scoring detail on each of the four sides, as well as some half-back pearls in the four corners.
After assembling the basket, I wove some yellow ribbon through the bottom and embellished with two Prima flowers and some burlap string.
I doubled the handle length by cutting two handles and attaching them together in the center with a decorative brad and some flowers.
The handle is then attached to the basket sides with decorative brads and circle accents (included in the cut file), then embellished with a bow.
Optional inner panels are included in the file. I used those to cut the darker green panels that line the open weave sides.
I have a confession to make. After I assembled the basket and did some basic embellishing (scoring, pearls, flowers, ribbon), I stared at this off and on for days, thinking, "what else can I/should I do to this?" Finally, the light bulb went off. The whole point of these files is precisely that you *don't* have to spend a lot of time thinking and fussing! The designs are so adorable and well-engineered, you pretty much cut, assemble, and go!! How awesome is that?! If you've never tried working with a cut file, I really, really encourage you to give one of the MTME Pretty Packaging templates a whirl. You'll be addicted in no time!
As for the coordinating card, I used an awesome new set called Occasional Labels, which comes with five frames, oodles of mix-and-match sentiment components, and even some flower silhouette images. I should note that I used the stamps in a somewhat unconventional way, which was totally fun, but you need to see some more conventional designs too to get an idea of the full range of this set :) The beautiful Occasional Label shape is also available as a separate Pretty Pieces cut file. No need to hand-trim, just cut the label, stamp your frame and sentiment, and you're all set -- love that!
For the card, I started with, believe it or not, leftover packaging from a set of Prima flowers. I've seen this type of product recycling many times, but this is the first time I've done it personally. Goin' green, baby! I shabbied up the edges with an acrylic paint wash, tied on some ribbon, added the stamped Occasional Label and stamped "Easter" sentiment, then embellished with a flower, pearls, and a crystal and pearl flourish. Easy!
Whew! Told you it would be a long post. Thanks for sticking with me because it's now my great pleasure to send you to the amazing MTME designers for more peeks at the Berry Sweet Basket template! Enjoy!!
Lauren Meader
Kristin Eberline
Debbie Marcinkiewicz
Katie Cotton
Lisa Kind
Monique Hansen
Tangii Crane
Thanks so much for stopping by!
Labels:
ABC,
Cricut,
stamps by My Time Made Easy
Sunday, March 27, 2011
Chicks {Still} Dig Me
So this is the crazy card I made my Dad for his 70th birthday yesterday. I think it embarrassed him a little, but my Mom loved it. She looked up at him and said, "I still dig you," which earned her an adorable kissy-kiss PDA (and not a single "gross" from any of the grandchildren). So sweet!
The stamps are from Verve's brand-new Chicks Rule set (now available in the store):
The papers are from Crate Paper's Portrait collection. One of the patterns includes twelve calendar pages. I just cut out March to customize the card a little. The bow-tie is actually the bow stamp from Chicks Rule that coordinates with the Easter basket image. I thought it helped turn the she-chick image into a he-chick. I got totally lucky and found a bow-tie ribbon slide in my stash that fit the bow image to a T. Lotsa bling elsewhere helped with the whole black-tie look I was going for.
And here's the inside:
The sentiment is a mixture of stamps from Happy Days and Chicks Rule. The font combo is questionable, but I couldn't resist incorporating the "spring chicken" sentiment!
Be sure to swing by the Verve blog today for the March Release After Party, where we're featuring some of the Divas' favorite release samples. Awesome stuff!! Also, right now through April 15th, you can save 15% when you purchase the March 2011 Stamp Collection bundle!
(While you're there, don't miss out on the Spring Savings sale! Sale prices are good through the end of March!)
Stamps: Chicks Rule (Verve Stamps)
Paper: Papertrey Kraft and Rustic White card stock, Stampin' Up Basic Black card stock, Crate Paper Portrait designer paper
Ink: Memento Tuxedo Black, Versafine Onyx Black, Ranger Old Paper Distress Ink
Accessories: Copic markers, Papertrey buttons and ribbon, My Favorite Things Small Open Scallop border die, paper piercer, needle, thread, Spellbinders circle Nestabilities, Prima bling, Maya Road star stick pin, number and phrase stickers (source unknown), Prima rhinestone and pearl flourish, bowtie and ribbon slide bling (source unknown), foam adhesive
Size: 5 1/4" square
Saturday, March 26, 2011
Faithful Friend
Today's card uses a new JustRite set called Song in My Heart. What beautiful sentiments -- all four of them! Behind the sentiment is a decorative frame from JustRite's Fancy Labels cling set. I stamped it in Stampin' Up's Night of Navy ink onto ivory card stock, lightly colored in the frame with a light aqua Copic maker, and then hand-trimmed the frame. You can bet I ordered the Spellbinders Labels Eighteen Nestabilities, which coordinate with this frame -- stalking my mailman until they arrive!
I used last week's Card Positioning Systems sketch (#209) for my layout.
Have a great weekend!
Stamps: Fancy Labels and Song in My Heart (JustRite)
Paper: Stampin' Up Baja Breeze, Neenah Classic Crest Natural White card stock, My Mind's Eye Stella & Rose designer paper
Ink: Stampin' Up Night of Navy and Soft Sky, Ranger Old Paper and Brushed Corduroy Distress Inks
Accessories: Spellbinders Small Ovals Nestabilities, Copic marker, Prima mini roses, butterfly (unknown), Offray navy ribbon, lace trim (unknown), foam adhesive, Kaisercraft adhesive pearls, Martha Stewart border punch, EK Success corner rounder
Size: 4 1/4" x 5 1/2"
Labels:
cards,
JustRite Stampers,
Stamper's Dream
Friday, March 25, 2011
Verve Spotlight: Chicks Rule
Tonight's the night. New Verve. 9 pm EST. Right HERE. Be there or be square {wink}.
Until then, feast your eyes on yet another fantastic New Release Spotlight Bog Hop. Our last featured set is Chicks Rule, and when I said a few days ago that this has got to be the most fun and playful Verve release to date, I wasn't kidding. Just wait until you see this set in full!
For my card, I've used one of the chick images, colored her pink (why not, right?) and outfitted her with a tiara and magic wand. The sentiment is stamped on a Charming Oval die-cut, which I've outlined with a doodle frame. The papers are from the Emma's Shoppe paper collection by Crate Paper (love!).
The layout is from the Week Five Viva La Verve sketch challenge, hosted by Sankari. Play along each week for your chance to win an upcoming Verve release in full!
Here's the sketch:
And here's the list of today's hoppers:
|
Once again, we've hidden a prize along the hop today! One lucky commenter on one of the Diva Hop Spots above will receive today's prize. Deadline for commenting is tonight, 6pm Mountain. Winners will be announced during tonight's ReLeAsE pArTy. Full details are posted on the Verve blog!
Enjoy the hop!
Stamps: Chicks Rule (Verve Stamps)
Paper: Copic X-Press It blending card stock, Crate Paper Emma's Shoppe, Papertrey Kraft, Prism Intense Pink
Ink: Versafine Onyx Black, Memento Tuxedo Black
Accessories: Spellbinders Labels Fourteen, Copic markers, Colorbok bling flourish, Pizzazz Aplenty 3mm clear rhinestones, Verve Charming Oval die, The Twinery twine, foam adhesive, paper piercer, needle, thread, Maya Road trim, yellow ribbon unknown, Papertrey buttons
Size: 4 1/4" x 5 1/2"
Thursday, March 24, 2011
Verve Spotlight: Egg-stra Special
It's Day Two of Verve's New Release Spotlights! Today's featured set is Egg-stra Special, an adorable Easter/Spring set featuring four different egg designs, some cute and punny egg sentiments and a whole lot more!
For my card, I focused on the different egg designs and created a hanging egg banner of sorts to go with the "You're Egg-stra Special" sentiment. The colors were inspired by some super cute Pebbles papers from their Happy Go Lucky line. It's almost impossible to see in the photo, but the main background panel is a very light blue with a fun flowery pattern. Each egg has been embellished with either mini pearls, glitter or a clear glaze pen. Here's a closer look:
Did you notice the die-cut I used for the sentiment? You guessed it ... one of Verve's new A Cut Above dies, Charming Oval!
Here's who's hopping today:
|
Once again, we've hidden a prize along the hop today! One lucky commenter on one of the Diva Hop Spots above will receive today's prize. Deadline for commenting is 6PM Mountain on Friday, March 25. Winners will be announced during our ReLeAsE pArTy that night! Full details are posted on the Verve blog!
One more thing ... I've entered this in the "Twine It Up" challenge over at Betty Bee's Buzz!
Hope you've enjoyed today's hop! See you again tomorrow!
Stamps: Egg-stra Special (Verve Stamps)
Paper: Papertrey white card stock, Pebbles Happy Go Lucky designer paper
Ink: Memento Tuxedo Black, Versafine Onyx Black
Accessories: Verve Charming Oval die, The Twinery twine, Stampin' Up vintage brads, Papertrey white button, My Favorite Things Jumbo Ric Rac, Fresh Cut Grass, and Little Open Scallop dies, paper piercer, needle, thread, foam adhesive, Pizzazz Aplenty 2mm white pearls, Sakura clear glaze pen, quickie glue pen, ultrafine crystal glitter, Copic markers
Size: 4 1/4" x 5 1/2"
Wednesday, March 23, 2011
Verve Spotlight: Lucky Ducky
Have you heard the good news?! Verve has a new release scheduled for this Friday! Like only two days away!! Mark your calendars for this Friday evening, 9-11 Eastern Time so that you'll be free to join us at the release party over in the Verve Forum on SCS. Hope to see you there!
This has got to be the most fun and playful release to date. Can't wait for you to see the cuteness, starting with Lucky Ducky, today's featured set! Be sure to hop around the Divas' blogs today for more peeks. Leave comments for your chance to win Lucky Ducky and this month's Plain Jane, Hope Perches. Details are posted on the Verve Blog, where you'll also be introduced to this month's awesome guest designer. Welcome, Janelle!
Here's the official hop list for today.
On your mark, get set.... HOP! :)
|
For my card, I went super playful with a fun circle-based layout and cheerful blue and yellow papers from My Mind's Eye's Gertie paper collection. Details include: a dry embossed background, zigzag stitching, a paper pieced bill, a pinked border, a wavy border, and some yellow twine.
Thanks for stopping by, and have a fantastic day!
Stamps: Lucky Ducky (Verve Stamps)
Paper: Stampin' Up Early Espresso card stock, My Mind's Eye Stella & Rose "Gertie" designer paper
Ink: Memento Tuxedo Black
Accessories: Making Memories button, The Twinery twine, MFT wave Die-namics, corner rounder, Spellbinders classic circle Nestabilities, foam adhesive, pinking shears, Papertrey ribbon, paper piercer, needle, thread
Size: 4 1/4" x 5 1/2"
Tuesday, March 22, 2011
Friendship Blooms Birthday
I apologize I'm so late making good on yesterday's promise to show another fun idea for JustRite's Friendship Blooms set. I feel like the whole day just vanished! Like yesterday's card, today's focuses on two patterned flower images in the Friendship blooms set. I was playing around with Crate Paper's new Emma's Shoppe collection and remembered some handmade flowers the Crate Paper girls were featuring on the CP blog a little while back. Which inspired me to see if I could make something more dimensional with the JustRite flower images.
Here's a closer look at what I came up with:
And here's how I made them ...
1. Stamp two large flowers, one small flower, and one center. Trim them out.
2. Using a scoring tool (I used my Scor-Pal), score the two larger flowers as shown (I flipped one over so you could see the scoring better). Fold each score line and crease with a bone folder.
3. Cut out one petal from each flower.
4. Add adhesive to the back of one petal as shown. (Do this for both flowers).
5. Hold both petals together with the notch facing up.
6. Rotate the top flower clockwise two petals so that the petal to the left of the notch is on top of the petal to the right of the notch on the bottom flower. Adhere top and bottom petal together.
7. Accordian-fold, beginning with the two petals you just glued together. (Starting with a valley fold hides the seam better.) Note: after the first double-petal, you'll be folding the bottom flower only at this point.
8. When you reach the end of the bottom flower (let's call it B), pull it in front of the top flower (we'll call this one A). Secure the last petal of flower B to the first petal of flower A.
9. Finish accordian-folding the rest of the flower.
10. I adhered the small flower using a stack of foam adhesive (I used four of Stampin' Up's dimensionals).
11. Top with a flower center and embellish (glitter, gems, buttons, etc.) as desired.
That's it! I'm thinking you could use these steps to turn any circular image into an accordian-fold rosette. And if you want more peaks and valleys, add a third flower.
Thanks so much for stopping by and for all of your sweet comments. Sometimes I wonder if there's any possible way all of you could know how much you mean to me! My sincerest heartfelt thanks!!
Stamps: Friendship Blooms and Just Ducky [sentiment] (JustRite)
Paper: Papertrey Rustic White, Crate Paper Emma's Shoppe designer paper
Ink: Ranger Barn Door Distress Ink, Papertrey Summer Sunrise, Memento Tuxedo Black
Accessories: Scor-Pal, foam tape, May Arts red jumbo ricrac ribbon, pinking shears, corner rounder, The Twinery twine, Stampin' Up branch die, Buttons Galore Tuxedo buttons, May Arts ivory burlap string
Size: 4 1/4" x 5 1/2"
Labels:
cards,
JustRite Stampers,
Stamper's Dream
Monday, March 21, 2011
JustRite Blog Hop: Friendship Blooms
Along the hop, three fantastic prizes are hidden. For your best chance at winning one of these prizes, just leave a comment on each blog. Blog comments will remain open until 8 pm CST, Tuesday, March 22. The three winners will be announced on the Stamper's Dream Blog and the JustRite Blog on Wednesday March 23rd.
The three prizes are:
- Four JustRite stamps sets of your Choice
- One $50.00 shopping spree at the JustRite webstore
- One $50.00 prize package from Stamper's Dream (shown below)
A quick word about today's card and then a bunch of detail shots to show off both the JustRite stamps and many new lovelies that have recently arrived at Stamper's Dream. I used JustRite's Friendship Blooms cling-mount set along with some gorgeous papers from Prima's Botanicals 6x6 pad. Among the many sentiments and frames in Friendship Blooms are two patterned flower shapes. I stamped them both in Antique Linen Distress Ink for a soft, subtle look, stacked them, and added a sentiment in Peeled Paint Distress Ink. Here's a closer look:
And then I went crazy embellishing around my sentiment flower. Behind the flower is a Maya Road square kraft envelope. Between the flower and the envelope are two layers of trim -- the back one from my stash and the front one by Prima. Also tucked in there is a Kaisercraft wood flourish. This one is old -- newer wood accents are in the Stamper's Dream store.
And last, I topped my ribbon with two mini fabric flowers that I cut out of some new Small White Roses Organza Ribbon by Maya Road (except I might have used ivory - it doesn't look quite white white. It also comes in red, by the way).
Before I wrap up, I have to show you a peek at another super fun way to use the flower stamps in Friendship Blooms. Tomorrow I'll share the full card and a quick how-to.
Don't forget ... your next stop on the hop is the amazing Kazan!
And here's the full line-up in case there are any hiccups along the way:
JustRite Inspiration Blog
Becca Feeken
Michelle Rodgers
Debbie Olson
Amy Sheffer
Kazan Clark
Cindy Lawrence
Heidi Blankenship
Kellie Fortin
Tosh Leyendekker
Barb Schram
Arlene Cuevas
Michele Kovack
Teresa Kline
Kathy Jones
Mariana Grigsby
Sankari Wegman
Christina Fischer
Angela Barkhouse
Lea Lawson
Eva Dobilas
Kim Teasdale
Thanks for stopping by, and happy hopping!
Stamps: Friendship Blooms (JustRite)
Paper: Prism Simply Smooth Ivory card stock, Prima Botanicals dp, Papertrey Kraft and Rustic White
Ink: Antique Linen, Peeled Paint, and Brushed Corduroy Distress Ink
Accessories: May Arts twill ribbon, Prima ecru trim, ivory trim (unknown), Maya Road square kraft envelope and mini rose organza ribbon, Kaisercraft wood flourish, Prima melon candy gem stem, paper piercer, needle, thread
Size: 4 1/4" x 5 1/2"
Labels:
cards,
JustRite Stampers,
Stamper's Dream