Friday, July 31, 2015

Have A Striking Birthday


How about a fun, weather-themed birthday card for today? Papertrey's new So Striking set, designed by Maile Belles, is super fun and trendy. I've had so much fun playing with it!


There's perhaps more going on than meets the eye, so I'll point out some of the details:
  • Spring Rain background is stamped with white clouds  
  • Vellum overlay is stamped with falling rain in white and tiny droplet trios in VersaMark   
  • Clouds and lightning are positioned, then machine stitched onto the vellum and Spring Rain layers, with long thread tails left hanging 
  • Several layers of the striking die-cut are stacked for extra dimension  

 Happy Friday, and thanks for visiting!


Monday, July 27, 2015

Moments Inked: Holiday Gift Ideas


Hello friends, today's post is for my fellow planner lovers. Typically, thoughout the year, I'll think of a great gift idea for a certain someone, maybe I'll jot it down, maybe not, then in November/December, I'm at a loss what to get that person because I can't remember that great idea or I've misplaced my note. So this year, I thought I'd create a holiday section in my Moments Inked Memory Planner specifically for recording those ideas. Of course, it has to be functional, but pretty too! Today's post is all about what I've come up with.


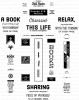
I started by designing a two-column full page. Each page (die-cut using the full page die found in the  Divided die set) has two pictures and some list lines in the space below. 

I decorated the pages with some stamping, each slightly different:

 ~ the dotted divider line is from Plaid Builder ~
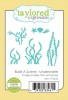
~ the list lines are from Listed ~
~ the black photo frame circles are from Borders & Corners {Circles} ~
~ holiday images are either Mistletoe & Holly or Tinsel & Tags Sprigs


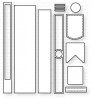
On the left side of the spread is a pocket that I adhered to the back of the previous page. Originally I had thought to use this for receipts once I start making purchases, but a crafty friend gave me the great idea to use it for catalog clippings in the meantime. Loved that idea!

The pocket layer is die-cut using the Moments Inked: Pocket Page Die. (Remember to die-cut from the back side if you plan to adhere your pocket to the back, otherwise, your spiral edge will be on the wrong side.)

I'm sure these little munchkins will have their own wish lists, too. I'll just slip those into the corresponding pockets, or die-cut their lists with one the Basic Pages dies and tuck it right in.


This page makes me giggle -- that big ol' bow on my dad's head is too funny! (I stamped all of these before I figured out who was going where!)


The larger stamped images are so visually appealing, and I think as long as I write in black, I'll have no trouble reading the lists.


I added a page without photos at the end where I could jot down gift ideas for additional recipients. I also included space where I could write down my own wish list, so that when my family asks, I'll have some ideas ready.


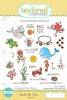
I made a full-size divider page and "holiday" tab using dies from the Divided die set and an image from the Divided stamp set. As the holidays get closer, I can expand this section to meet other holiday planning needs (decorating, holiday meals, party planning, Christmas cards, etc.).


I moved the various sections I've added to my planner up to the front (they were in the back) to help balance out the planner when I have it open to the weekly spread and daily notes. Because these pages and dividers and pockets were all made with Moments Inked dies, I can easily pull them out and reposition, even with the spiral binding. I love that!

I have also moved the daily pages for January through June to a storage binder in order to make room for some of the add-ons I've created. This involved uncoiling and re-coiling, which takes a little more time. It's worth it, though, for the extra space, and since I only remove the daily pages a few times a year, it's not a problem at all.

Thanks so much for joining me today. I hope I've given you some ideas for ways to make your Moments Inked Memory Planner work for you!

Have a great week!

Sunday, July 26, 2015

Welcome - July SFYTT


Just a colorful reminder that there's still time to play along with Reverse Confetti's July SFYTT.


The deadline is noon CST on the 29th. Hope you'll join us! All are welcome to play, and if you use Reverse Confetti stamps, you're eligible for a $20 Reverse Confetti gift certificate.

Here's the sketch, and the link-up is HERE:


At a recent crafty get-together with friends, I was remarking on how my style seems to be changing, and I don't use patterned paper as much as I used to. So for today's card, I challenged myself to make a card out of almost all patterned paper.


The papers are from the lovely Poolside 6x6 collection by Crate Paper. For the large circle element on the sketch, I subbed in a pineapple trio stamped with Reverse Confetti's Pineapples Aplenty stamp set and die-cut with the coordinating Pineapples Aplenty Confetti Cuts. The paint chip-looking panel was die-cut using the large rounded rectangle die from the Documented Confetti Cuts set. 


Also from the Documented Confetti Cuts set is this cute little notched flag. I machine stitched it to the rounded rectangle, then lightly pulled the top and bottom forward for a little dimension.

Visit the Reverse Confetti blog today for more July SFYTT inspiration.


CONFETTI CUTS DIES: Pineapples Aplenty, Documented

PAPER: teal, stone, and white card stock; Crate Paper Poolside 6x6 collection

OTHER: gold embroidery floss, black enamel dots, sewing machine, foam adhesive, distressing tool


Thanks for visiting today, and I hope you enjoy the rest of your weekend!

Saturday, July 25, 2015

Relax With the Turning of Every Page


Today I thought I'd share another card I made with Papertrey's new Bibliophile stamps and dies. I can't put my finger on it, but I'm not loving this one. I wanted to share it anyway, though, to show you the idea of adding that linen napkin under the teacup, which I made with the new Embroidered Frames: Dots dies.

But first, the books are stamped and die-cut with Bibliophile stamps and Bibliophile dies. I love the look of the stacked books, and how you can incorporate your sentiment into the book spines. Just so darn cute and clever! There's actually another line to the sentiment that I chose to omit. The full sentiment is "Relax, may you feel better with the turning of every page."


The Fancy Teacup die is gorgeous. I lightly sponged the solid background layer in Aqua Mist ink and the more intricate top layer in Harvest Gold ink. I added a strip of Pure Poppy card stock behind the little circles, too.

For the napkin, I die-cut the smaller rectangle from the Embroidered Frames: Dots die set out of Fresh Snow linen card stock, leaving the middle part inside the frame and securing with a little tape on the back. I arranged it at the angle I wanted, then trimmed off the top and right before layering it over the book stack.

I think what's bugging me about this card is that it feels like it should have more of a vintage, flowery tea party look. This looks like a circus :) I look forward to giving it another go in a totally different style!

Enjoy your weekend!


Friday, July 24, 2015

Under the Sea


Please join me on the Taylored Expressions blog today for a cute underwater Birthday Fishes card featuring the Under the Sea stamp set, plus Build A Scene - Rolling Waves and Build A Scene - Underwater dies. I made this over a month ago, and it seems to have kicked off what feels like a non-stop watercoloring binge that's been going on ever since!