Wednesday, November 11, 2015

Crazy for Christmas - Gift Giving


Today is Day Two of Reverse Confetti's CRAZY FOR CHRISTMAS showcase. Three days of Christmas inspiration brought to you by the Confetti Crew. Yesterday's focus was "Ready to Party." If you missed it, click HERE to catch up.


Today, we turn our attention to gift-giving. Whether you're hand-making the gift itself or dressing up your gift packaging, Reverse Confetti stamps and dies are perfect for adding that extra something special.


Sing along with me: "Brown paper packages tied up with strings; these are a few of my favorite things ..."  If you stop by here regularly, you've no doubt noticed that I love embellishing kraft bags and boxes. They're like the little black dress of the crafting world! For today's project I've created a felt Christmas light garland and used it as a package topper for a simple kraft box.


I started by die-cutting two lights from each of five festive felt colors using the Merry & Bright Confetti Cuts die. (I chose to use felt so that the garland would be study enough to save and re-use, either on a package or as decor.) I stitched the two layers together using a blanket stitch and coordinating embroidery floss


I embellished several of the individual lights with a Holly leaf and some silver jingle bells. After the lights were completed, I threaded some silver metallic floss through all of the lights to make the garland. Simple knots on either side of the bulb keep them in place on the garland.


I adhered the garland to the package with some mini glue dots. The garland is easy to remove, and the glue dots don't leave any mark on the felt. Around the ornaments, I added some clear sequins and some stamped "snowflakes" (done with the asterisk in Alphabetical). 


Since this box has a detached lid, I tied it shut with some super thick, wired white tinsel.


The tag was super simple: I just die-cut one of the Holly Jolly Quick Card Panels using the Topped Off Tag die, then added a vellum Hang Ups, a red grommet, and some Charcoal Twine.


STAMPS: Alphabetical

CONFETTI CUTS DIES: Merry & Bright, Holly, Topped Off Tag, Hang Ups, 

INK: white


OTHER: brown paper box, wired tinsel, felt, embroidery floss, charcoal twine


  For lots more gift-giving inspiration, visit the following Confetti Crew members:


Tuesday, November 10, 2015

One-Layer Pinecone Wreath


You all know I'm kind of a layer loving cardmaker, right? I envy those who can pull off a one-layer card with style and pizzazz. Mine usually end up looking plain and boring. So when I do managed to pull it off, naturally I get really jazzed about it! I hope you'll visit me over on the Taylored Expressions blog today to see what I've put together using their gorgeous Simply Stamped - Pinecones stamp set. See you over there!

Sunday, November 8, 2015

Reverse Confetti November Release Blog Hop


Hello and welcome to Reverse Confetti's November Release Blog Hop! All the stamp sets, Confetti Cuts dies, and Quick Card Panels you've been seeing these last few days are now available in the Reverse Confetti store. 


To celebrate the new release, we are blog hopping today. If you've already started today's hop, then you should have arrived here from Amy Tsuruta's blog. If not, head over to the Reverse Confetti blog to begin! When you're finished here, you'll be heading to Leigh Penner's blog next.

Before I share my projects, I want to encourage you to join us again November 10, 11, and 12 for our Crazy for Christmas project showcase, where the design team will be showcasing all sorts of unique projects and ideas for the holidays. Heavy dose of crafty inspiration guaranteed!


 Now, onto my projects for today. This first project is a simple, mass producible brown paper treat sack.


I started by repeatedly stamping a plain brown paper bag with a "fresh baked with love" sentiment from the With Love stamp set in lime green and red ink. I added tiny dots with a white gel pen and some starbursts from You are A Star in white ink.


I folded over the top of the bag and stamped a dot pattern in white using Whole Lotta Dots.


I made a tag out of one of the Stitched Flag Trio Confetti Cuts dies, stamped it with the to/from image from With Love  then punched a hole in the top and added a grommet from Hang Ups. Super easy, affordable, and mass producible!


CONFETTI CUTS DIES: Hang Ups, Stitched Flag Trio

INK: white, black, lime, and red inks

PAPER: white and red card stock

OTHER: white gel pen, red striped ribbon, white linen thread, brown paper sack


Next up is another quick packaging idea. 


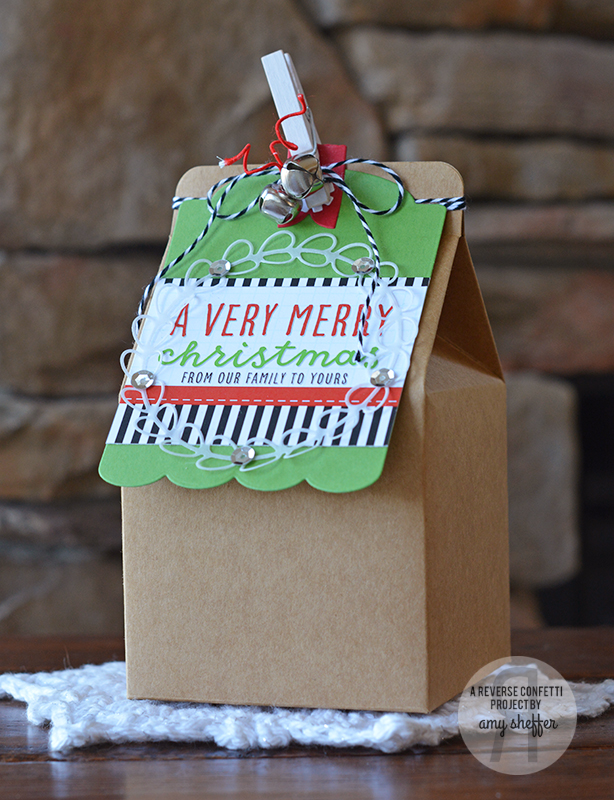
Here, I've assembled a kraft milk carton gift box that I found in the Target dollar spot (two in a package) and clipped on a tag made with the Gift Card Holder Tag Confetti Cuts dies.


I started off by die-cutting a green tag with the Gift Card Holder Tag die. I trimmed down one of the Holly Jolly Quick Card Panels and layered that onto the green tag base, then layered on a vellum wreath done with the Wreaths Confetti Cuts set, and accented with silver sequins.


I added a red Hang Ups tab at the top, and clipped the tag to the carton using a mini white paper clip. I accented with black and white baker's twine, jingle bells and some red wire.


CONFETTI CUTS DIES: Hang Ups, Gift Card Holder Tag, Wreaths, 

PAPER: green card stock, vellum, Holly Jolly Quick Card Panels

OTHER: white mini paper clip, jingle bells, black and white baker's twine, red wire, sequins


Thanks so much for hopping with us today! Your next stop is the super talented, inspiring Leigh Penner. Enjoy the rest of the hop!


Saturday, November 7, 2015

Countdown to Confetti: Bubbly Tag Toppers


Welcome to the third and final day of Reverse Confetti's November release countdown. All of the new products will be available in the Reverse Confetti store tonight at midnight. 


Be sure to visit the Reverse Confetti blog for links to all the designers posting peeks today. Leave comments on each designer's blog for a chance to win a $15 Reverse Confetti gift certificate. Also, head over to the Reverse Confetti Facebook page for another $15 giveaway.


Today we are featuring the Bubbly Tag Toppers Confetti Cuts die set. This is another fun topper design for the Topped Off Tag die featured yesterday. How fun and playful these circles are!


I decided to arrange two Topped Off Tags head-to-head for kind of a belt/band look. To start, I sponged two Topped Off Tags with light green and light pink inks, then added the Bubbly Tag Toppers in white card stock. On the bottom tag, I added a Layered Snowflake in white card stock with super light pink sponging around the perimeter of each layer. 


On the top tag, I added a sentiment. The "let it," from Winter Word Coordinates, is white embossed, and "snow" is from the Winter Words Confetti Cuts die set. Each tag has a Hang Ups loop at the top. The one on the top tag is finished off with a large silver brad and some metallic silver embroidery floss. 

Last steps were to add some white splatter to the tags, a layer of torn vellum, some pink and green splatter to the white card base, and some clear sequins.

I received some questions yesterday about those silver brads -- mine are really old ones from my Stampin' Up demo days. I can't find anything similar in a quick internet search, but these silver flourish brads from Michael's look fun. You could also look for decorative shank buttons (the kind with no holes).


CONFETTI CUTS DIES: Hang Ups, Topped Off Tag, Bubbly Tag Toppers, Winter Words, Layered Snowflake

INK: VersaMark, light green and light pink inks

PAPER: white card stock, vellum

OTHER: ink blending tool, Mister Huey opaque white, silver metallic embroidery floss, clear sequins, oversize silver brad


  Remember to head to the Reverse Confetti blog for more inspiration and links to today's design team posts.

And remember to mark your calendars for our upcoming Crazy for Christmas online event, November 10, 11, and 12.


Join us again tomorrow for our New Release blog hop. Thanks for stopping by!