Tuesday, April 5, 2011

My Time Made Easy: A Year in Review


Today I'm joining the My Time Made Easy girls for their monthly Year in Review feature, where they take a look back at favorite stamp sets and templates from previous releases. I was thrilled at the chance to play with the Singing Silhouette set from last month. The sweet birds and birdcage images are both trendy and timeless. Color me smitten! I used papers from Prima's new collections, Madeline and Reflections. The sentiment tab is actually part of the MTME Occasional Label cut file. In the extra white space above the sentiment, I added two small metallic brads to balance out that big, honkin' (and totally gorgeous) button at the bottom right, which is a Tim Holtz Alterations product. You can't see very well in the above photo, but the birdcage is adorned with numerous 2mm pearls. Here's another look:


Sadly, this is my last official post as guest designer for MTME. I've had a blast working with the templates and stamps and want to thank Lauren, Kristin, and the whole gang for the opportunity! And speaking of the whole gang, I can't wait to see what they've put together for today. Aren't they just amazingly creative??

Lauren Meader
Kristin Eberline
Debbie Marcinkiewicz
Katie Cotton
Lisa Kind
Monique Hansen
Tangii Crane

Thanks so much for visiting!

Monday, April 4, 2011

My Time Made Easy: Occasional Labels


The My Time Made Easy designers and guest (that's me) are continuing to showcase all the newly released goodies. In case you missed anything, here's a quick re-cap from the weekend:


Saturday: Lauren, Katie, Kristin, and Lisa

Sunday: Lauren, Debbie, and Tangii

Also posting today are: Lauren, Monique, and Kristin

With teacher appreciation week coming up in early May, I decided to put together a card set using the new Occasional Labels, Sentimental Occasions, and the Occasional Label Pretty Pieces cut file. I can see this trio becoming a definite go-to item for creating beautiful card sets, especially since {squeal} one of the frames is gingham!!! Be still my heart! Seriously, I love the look of a splash of gingham with just about anything else. It's so perfect and so sweet! And the build-it-style sentiments provide so much versatility!

Here's a look at my card set, one by one. The only things I changed were the sentiments and the floral silhouettes (there are four flowers in the Occasional Labels stamp set):


Of course I needed some cute packaging to hold them all. The Slip Cover Pretty Packaging template was perfect:


Can't wait to make a couple more of these!


Thanks for stopping by!


Stamps: Occasional Labels, Sentimental Occasions (My Time Made Easy)
Paper: Stampin' Up Old Olive and Baja Breeze, Papertrey Rustic White, Prima designer paper
Ink: Versafine Onyx Black, Stampin' Up Baja Breeze, Ranger Peeled Paint, Antique Linen, and Walnut Stain Distress Inks
Accessories: MTME Occasional Label Pretty Pieces cut file, MTME Slip Cover Pretty Packaging template, Cricut, SCAL software, Stampin' Up striped green ribbon, Papertrey button and satin ribbon, Prima trim, doilies, May Arts burlap string, Martha Stewart buttons, Pizzazz Aplenty bling, sewing machine
Card Size: 4 1/4" x 5 1/2"

Friday, April 1, 2011

My Time Made Easy: Keep It Organized


Today, the My Time Made Easy designers and guest (that's me) are featuring another Pretty Packaging Template -- Keep It. If you're organizationally challenged, or even just an office supply junkie (I am!), this template is for you! It's comprised of three parts, a back pocket sized to fit A2 cards, a smaller middle pocket (think Rolodex, business cards ...), and a pull-out drawer below. Additional Pretty Pieces cut files, Keeping Tabs File Divider Large and Keeping Tabs File Divider Mini, are available, too. And then a companion stamp set, Keep It Organized, is available to help you label your organizer and divider cards just the way you want to. Between the cut files and the stamps, you'll have everything you need to make desk organization not just a reality, but cute, stylish, and fun to boot.

The first thing I wanted to make was a birthday card organizer. I cut the various template components out of Wild Wasabi card stock and assembled. Then I cut some decorative panels (included in the Keep It template) out of new digi papers from MTME, Occasional Blooms and Love Defined - Wasabi.


To dress up the box, I added a big chipboard "S" monogram, framed by a large chipboard ring, and accented with some yellow ribbon and chunky purple buttons.


Inside the larger box, I've added twelve Keeping Tabs Large File Dividers, labeled January through December (done with the Keep It Organized stamps). I will use each tab as a perpetual birthday calendar for that month and possibly store cards behind the current month.


Inside the smaller box, I've added some Keeping Tabs Mini File Divider cards, labeled for alphabetic organization. Here's where I'll keep addresses.


For the drawer pull (the drawer does close all the way, by the way), I took a glass jewelry bead, bent the hooks on either end a little bit and secured them to the drawer front with silver brads.


I even covered the back with decorative panels.


Last is a side view to show some of the monogram dimension.

Hop on around the MTME designers' blogs for more Keep It Organized inspiration:

Lauren Meader
Kristin Eberline
Debbie Marcinkiewicz
Katie Cotton
Lisa Kind
Monique Hansen
Tangii Crane


Thanks so much for visiting!

Thursday, March 31, 2011

My Time Made Easy: So Berry Sweet


I have some super fun news, a project, and a very long post to share today. I've been invited to guest design for My Time Made Easy and of course wasted no time saying yes! I've always been beyond amazed at Lauren's inventiveness, and her design team is so incredibly talented.  It is an honor to join them for the April release!

The next six days will be packed with inspiration as the MTME designers showcase some new templates and stamp sets, which will be officially available in the MTME store tomorrow, April 1. Today, we're featuring the new Pretty Packaging template called Berry Sweet Basket, an adorable basket that looks just like the fruit containers you see at the grocery store. I chose to use it as an Easter gift basket to hold a simple potted plant, and I have to say, I'm in awe over how much this basket does to dress up an otherwise ordinary item!

I started by cutting the basket pieces out of some nice Spring green card stock using my Cricut along with the Sure Cuts A Lot software. (If, like me, you're new or relatively new to cut files, check out Lauren's Easy Guide to Using Cricut with SCAL Software tutorial [scroll down toward the end], where she walks you through everything you need to know.)


Before I assembled my basket pieces, I added a little bit of scoring detail on each of the four sides, as well as some half-back pearls in the four corners.

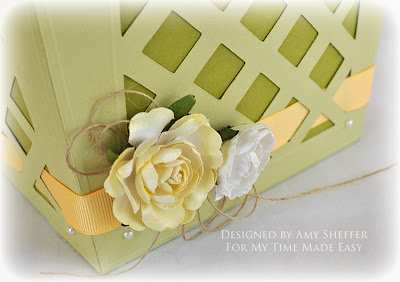
 After assembling the basket, I wove some yellow ribbon through the bottom and embellished with two Prima flowers and some burlap string.


I doubled the handle length by cutting two handles and attaching them together in the center with a decorative brad and some flowers.


 The handle is then attached to the basket sides with decorative brads and circle accents (included in the cut file), then embellished with a bow.

Optional inner panels are included in the file. I used those to cut the darker green panels that line the open weave sides.

I have a confession to make. After I assembled the basket and did some basic embellishing (scoring, pearls, flowers, ribbon), I stared at this off and on for days, thinking, "what else can I/should I do to this?" Finally, the light bulb went off. The whole point of these files is precisely that you *don't* have to spend a lot of time thinking and fussing! The designs are so adorable and well-engineered, you pretty much cut, assemble, and go!! How awesome is that?! If you've never tried working with a cut file, I really, really encourage you to give one of the MTME Pretty Packaging templates a whirl. You'll be addicted in no time!


As for the coordinating card, I used an awesome new set called Occasional Labels, which comes with five frames, oodles of mix-and-match sentiment components, and even some flower silhouette images. I should note that I used the stamps in a somewhat unconventional way, which was totally fun, but you need to see some more conventional designs too to get an idea of the full range of this set :) The beautiful Occasional Label shape is also available as a separate Pretty Pieces cut file. No need to hand-trim, just cut the label, stamp your frame and sentiment, and you're all set -- love that!

For the card, I started with, believe it or not, leftover packaging from a set of Prima flowers. I've seen this type of product recycling many times, but this is the first time I've done it personally. Goin' green, baby! I shabbied up the edges with an acrylic paint wash, tied on some ribbon, added the stamped Occasional Label and stamped "Easter" sentiment, then embellished with a flower, pearls, and a crystal and pearl flourish. Easy!

Whew! Told you it would be a long post. Thanks for sticking with me because it's now my great pleasure to send you to the amazing MTME designers for more peeks at the Berry Sweet Basket template! Enjoy!!

Lauren Meader
Kristin Eberline

Debbie Marcinkiewicz
Katie Cotton
Lisa Kind
Monique Hansen
Tangii Crane

Thanks so much for stopping by!