Friday, April 1, 2011

My Time Made Easy: Keep It Organized


Today, the My Time Made Easy designers and guest (that's me) are featuring another Pretty Packaging Template -- Keep It. If you're organizationally challenged, or even just an office supply junkie (I am!), this template is for you! It's comprised of three parts, a back pocket sized to fit A2 cards, a smaller middle pocket (think Rolodex, business cards ...), and a pull-out drawer below. Additional Pretty Pieces cut files, Keeping Tabs File Divider Large and Keeping Tabs File Divider Mini, are available, too. And then a companion stamp set, Keep It Organized, is available to help you label your organizer and divider cards just the way you want to. Between the cut files and the stamps, you'll have everything you need to make desk organization not just a reality, but cute, stylish, and fun to boot.

The first thing I wanted to make was a birthday card organizer. I cut the various template components out of Wild Wasabi card stock and assembled. Then I cut some decorative panels (included in the Keep It template) out of new digi papers from MTME, Occasional Blooms and Love Defined - Wasabi.


To dress up the box, I added a big chipboard "S" monogram, framed by a large chipboard ring, and accented with some yellow ribbon and chunky purple buttons.


Inside the larger box, I've added twelve Keeping Tabs Large File Dividers, labeled January through December (done with the Keep It Organized stamps). I will use each tab as a perpetual birthday calendar for that month and possibly store cards behind the current month.


Inside the smaller box, I've added some Keeping Tabs Mini File Divider cards, labeled for alphabetic organization. Here's where I'll keep addresses.


For the drawer pull (the drawer does close all the way, by the way), I took a glass jewelry bead, bent the hooks on either end a little bit and secured them to the drawer front with silver brads.


I even covered the back with decorative panels.


Last is a side view to show some of the monogram dimension.

Hop on around the MTME designers' blogs for more Keep It Organized inspiration:

Lauren Meader
Kristin Eberline
Debbie Marcinkiewicz
Katie Cotton
Lisa Kind
Monique Hansen
Tangii Crane


Thanks so much for visiting!

Thursday, March 31, 2011

My Time Made Easy: So Berry Sweet


I have some super fun news, a project, and a very long post to share today. I've been invited to guest design for My Time Made Easy and of course wasted no time saying yes! I've always been beyond amazed at Lauren's inventiveness, and her design team is so incredibly talented.  It is an honor to join them for the April release!

The next six days will be packed with inspiration as the MTME designers showcase some new templates and stamp sets, which will be officially available in the MTME store tomorrow, April 1. Today, we're featuring the new Pretty Packaging template called Berry Sweet Basket, an adorable basket that looks just like the fruit containers you see at the grocery store. I chose to use it as an Easter gift basket to hold a simple potted plant, and I have to say, I'm in awe over how much this basket does to dress up an otherwise ordinary item!

I started by cutting the basket pieces out of some nice Spring green card stock using my Cricut along with the Sure Cuts A Lot software. (If, like me, you're new or relatively new to cut files, check out Lauren's Easy Guide to Using Cricut with SCAL Software tutorial [scroll down toward the end], where she walks you through everything you need to know.)


Before I assembled my basket pieces, I added a little bit of scoring detail on each of the four sides, as well as some half-back pearls in the four corners.

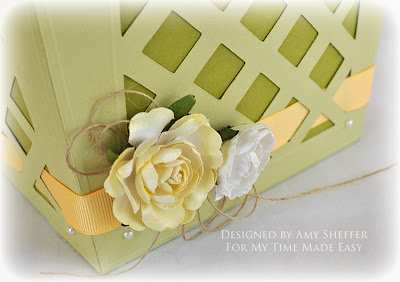
 After assembling the basket, I wove some yellow ribbon through the bottom and embellished with two Prima flowers and some burlap string.


I doubled the handle length by cutting two handles and attaching them together in the center with a decorative brad and some flowers.


 The handle is then attached to the basket sides with decorative brads and circle accents (included in the cut file), then embellished with a bow.

Optional inner panels are included in the file. I used those to cut the darker green panels that line the open weave sides.

I have a confession to make. After I assembled the basket and did some basic embellishing (scoring, pearls, flowers, ribbon), I stared at this off and on for days, thinking, "what else can I/should I do to this?" Finally, the light bulb went off. The whole point of these files is precisely that you *don't* have to spend a lot of time thinking and fussing! The designs are so adorable and well-engineered, you pretty much cut, assemble, and go!! How awesome is that?! If you've never tried working with a cut file, I really, really encourage you to give one of the MTME Pretty Packaging templates a whirl. You'll be addicted in no time!


As for the coordinating card, I used an awesome new set called Occasional Labels, which comes with five frames, oodles of mix-and-match sentiment components, and even some flower silhouette images. I should note that I used the stamps in a somewhat unconventional way, which was totally fun, but you need to see some more conventional designs too to get an idea of the full range of this set :) The beautiful Occasional Label shape is also available as a separate Pretty Pieces cut file. No need to hand-trim, just cut the label, stamp your frame and sentiment, and you're all set -- love that!

For the card, I started with, believe it or not, leftover packaging from a set of Prima flowers. I've seen this type of product recycling many times, but this is the first time I've done it personally. Goin' green, baby! I shabbied up the edges with an acrylic paint wash, tied on some ribbon, added the stamped Occasional Label and stamped "Easter" sentiment, then embellished with a flower, pearls, and a crystal and pearl flourish. Easy!

Whew! Told you it would be a long post. Thanks for sticking with me because it's now my great pleasure to send you to the amazing MTME designers for more peeks at the Berry Sweet Basket template! Enjoy!!

Lauren Meader
Kristin Eberline

Debbie Marcinkiewicz
Katie Cotton
Lisa Kind
Monique Hansen
Tangii Crane

Thanks so much for stopping by!

Thursday, February 10, 2011

Love Notes Mini Postal Drop Box


I've been having visions. Of something I want my Cricut to cut for me. I went looking for info on how to make a cut file (anyone? anyone? please, pretty please?), didn't find what I was looking for, but *did* stumble upon this freakin' adorable mailbox template over at SVGcuts.com. Love at first sight!

The sentiment (so perfect!) comes from Verve's Love Notes set. I let the Cricut do the hard stuff, then just assembled the box and added the stamped sentiment, some die-cuts and a few simple embellishments. Easy -- really!

 The front has a little pull-down door. I decorated the outside of it with some Stampin' Up houndstooth paper, a Spellbinders Labels Fourteen die-cut, the stamped sentiment, a punched leaf/branch, silver cord, and a rolled flower that I cut with my Rolled Flower Die-namics die from My Favorite Things.


 I decorated the left with houndstooth paper (the houndstooth panels are all cut with handy optional extra files in the SVGcuts kit), a heart that I cut with Verve's Jotted Heart die, more rolled flowers and two more punched branches.

 The right side I left plain ... just a houndstooth panel.


On the top is a seam binding/silver cord/button combo. I think I'll hang a To/From tag from the bow on the top, fill up the mailbox with some chocolates, and give it to one of my kids' teachers for Valentine's Day. If I can part with it {wink}.


Happy Thursday! Thanks for visiting!


Stamps: Love Notes (Verve Stamps)
Paper: Stampin' Up Cherry Cobbler card stock and Love Letter designer series paper, Papertrey Vintage Cream card stock
Ink: Versafine Onyx Black
Accessories: Valentine Mailboxes SVG Kit (svgcuts.com), Verve Jotted Heart die, Spellbinders Labels Fourteen Nestabilities die, My Favorite Things Rolled Flower Die-namics die, Martha Stewart branch punch,  Michael's silver cord, seam binding, Papertrey button, Kaisercraft black adhesive pearls, Scor-Tape, hot glue gun
Dimensions: 3 3/4"W x  5 1/4"H x 3"D

Sunday, August 1, 2010

Third Anni-VERVE-sary Blog Hop

Today, Verve is celebrating its third anniversary with a special blog hop featuring Verve fans everywhere! The festivities all begin with the head Diva and designer of all Verve-y goodness, Julee!

Julee, congratulations and happy third anni-Verve-sary. I wish you and Verve all the best for the year ahead and can't wait to see what's in store. Thank you for the opportunity to be part of the team. I'm truly honored!

If you've been hopping along already, you should have arrived here from Sara Henton. And when you're finished here, you'll head over to Wendy Space. If anything breaks down along the way, you can find the master list HERE.

We've got quite a few prizes hidden along the way, including tons of stamp set giveaways on each of the Diva blogs and a huge ($75) gift certificate hidden elsewhere along the hop. (I'm giving away Always On My Mind and a Psalm 3:3 Plain Jane - woohoo!!) Be sure to leave comments along the way for chances to win. The deadline to enter is 11:59 pm EST Wednesday, August 4. Happy hopping!

And happy shopping, too! The Anni-Verve-sary Sale has begun! All the details are over on the Verve blog. While you're there, give a warm welcome to Verve's two newest guest designers!

For today's project, I put together a little giftie for a friend who is currently battling breast cancer. I made the box using The Flapper cut file from My Time Made Easy.


The top of the box features the dangling hearts image and the "Hang in there" sentiment from Always on My Mind:


Inside I've placed a bar of handmade pink ribbon soap on a bed of pink crinkled paper Easter "grass."


And here's a closer look at the underside of the lid, where I've included Psalm 3:3. My friend's chemotherapy is taking its toll, and I just love the message here that the Lord is her shield during this battle and that He will lift her head whenever she's tired or weary.


That's it for me! Your next stop on the hop is Wendy Space. Have fun!


Stamps: Always on My Mind, Psalm 3:3 Plain Jane (Verve)
Paper: Neenah Classic Crest Solar White, The Girls Paperie "Paper Doll" collection
Ink: Ranger Antique Linen, Vintage Photo, and Walnut Stain Distress Ink
Accessories: Spellbinders oval and Labels Four Nestabilities, May Arts burlap string, Papertrey vintage buttons, foam adhesive, R83 Copic marker, corner rounder, distressing tool, Hug Snug white seam binding, Stampin' Up library clips