Hey, hey, hey, we're not quite finished with the Papertrey January release. There one more January product to introduce: Binder Page Dies for the Moments Inked Planner! Yes!!
The Binder Page die set comes with three different dies. The large is a full-size planner page. The medium *perfectly* holds the 3x6 white Post-Its (or two 3x3's). And then there's the small one, which die-cuts a horizontal strip and attaches to only three of the binder holes.
I dove right into these dies, so let me show you what I'm doing with them:
First ... the full-page die @ approximately 5 1/4" x 7"
Perfect for adding extra sections (dividers and pages), perfect for creating planner dashboards, perfect for creating "cover" pages (not really the cover obviously, but whatever you call that first page you see when you open your planner).
I die-cut a full-size page from one of those plastic two-pocket folders. I just happened to find some aqua ones at Five Below back in August, and I grabbed all that they had!
Since it's plastic, it's sturdy and durable, which works well for any planner page you'll be handling a lot, like section dividers.
Depending on your die-cutting machine and the thickness of the folders, you may not be able to cut all the way through the plastic. In that case, it's pretty easy to use an X-acto knife to finish the cutting. The partial cut creates a "channel" that you can use as a guide. (My folder cut all the way through with a Big Shot, but only if I used the precision plate.)
Also, if your dies warp ...
... just gently bend them back ...
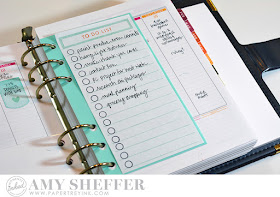
Next, the medium die @ approximately 3 5/8" x 6"
If you saw my 2016 planner review post, you saw that I was using a temporary spiral-edge Listed die-cut to hold my Post-It note to-do lists, as shown below:
That was less than ideal and only until something better came along. The medium Binder Page die is that something better!
So here's my to-do list now:
And last but not least, the small die at approximately 2 3/8" x 5".
This is a fun size! These little pages are great opportunity to keep something visible without covering up the whole weekly spread.
I created a laminated "Today's Top Three Tasks" page to keep right in with my weekly spread. It's a great visual reminder to help you tackle the right things first each day.
You can write on this with a wet-erase marker and re-use it day after day. You can also write on it with a Sharpie (like I did) and just use an alcohol wipe to remove it.
I also made a page for extra pen/pencil storage using the small Binder Page die and the Write Stuff Holders dies. I cut this page out of the plastic two-pocket folder as well, since the pen holder is going to need to hold up to wear and tear.
The Write Stuff Holders are taller than the small page so I die-cut the top loop first, then repositioned the die and cut the bottom loop.
By the way, the first one I made was with laminated Sheer Basics vellum. The laminating separated from the vellum where I die-cut the loop and the vellum tore easily, so I recommend against using that.
You might be wondering how much bulk the extra pen storage adds. Although the planner will still close with the pen holder page in there, it's really tight and will probably leave indentations, so I recommend removing pages if you want to accommodate extra pen storage. You could remove the monthly pages for July - December, for example, just leaving the monthly divider page and monthly spread for times when you need to do future planning. Or you could do a 3-month approach -- previous month, current month, next month.
One last look at the medium and small pages that I'm using for my to-do list.
Here's a little bonus content -- this week's bible verse. I hand-lettered the verse and decorated with hearts from Noted and the flowery vine from Choose Joy.
I posted last week's verse on Instagram and hope to continue posting there each week. I'm @amyksheffer on IG if you want to follow along!


Great ideas for the planner. I love the bible verse. I'll be checking your Instagram.
ReplyDeleteLove your planner ideas. My order list for tonight is growing and growing!!! TFS
ReplyDeleteFabulous work Amy, and thanks for the tip for the die, I do have some that need to be fixed!
ReplyDeleteHi, Amy! Thanks for stopping by my blog to take a peek at the card I created for this week's challenge at PTI. I appreciate it very much. I really love these planners. They seem to be the newest rage. But then......I just fell in LOVE with the sweet purses showcased yesterday. PTI is amazing. You're a blessed girl. Thanks for sharing your talents.
ReplyDeleteKaren Letchworth
www.karen-mycuprunnethover.blogspot.com
Heck, I didn't know I needed a planner until now!! Wow you have cool ideas!
ReplyDeleteIt's all your fault that I'm ordering a planner now, Amy! :) And P.S. I REALLY want you to do some tutorials on your hand-lettering! It's awesome!
ReplyDelete